Round Robin Assignment with Workload Balancing in ClickUp
ClickUp users have long requested a native feature for round-robin task assignment that also considers workload. The idea is simple: when a new task comes in, automatically assign it to team members in rotation, but prioritize those with fewer tasks currently on their plate.
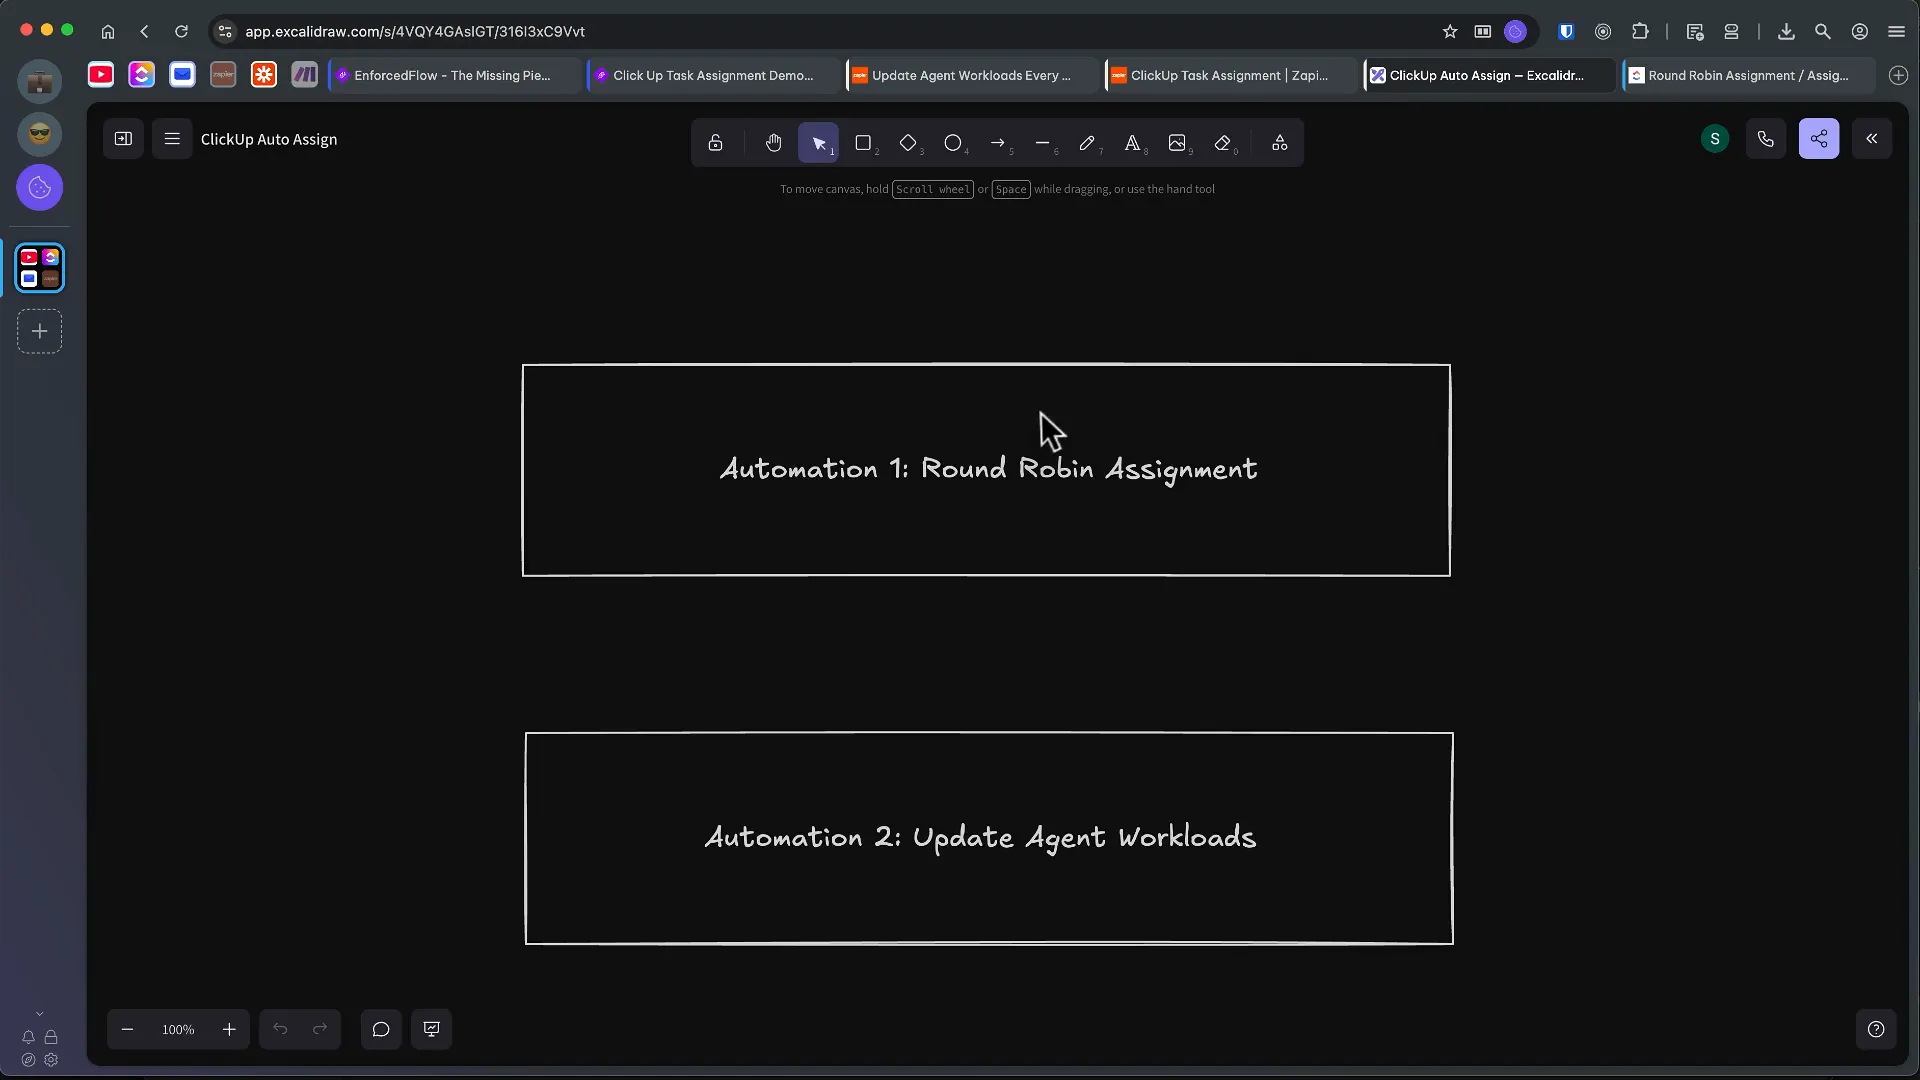
This guide shows you how to build this solution using EnforcedFlow’s Advanced Round Robin feature integrated with Zapier to create two automations:
-
Automation 1 (Task Assignment): When a new task is created in ClickUp, it automatically assigns the task to the next available agent based on their current workload priority.
-
Automation 2 (Workload Tracking): Runs on a schedule (e.g., every hour) to count each agent’s in-progress tasks and update their priority weights accordingly. Agents with fewer tasks get higher priority for new assignments.
Prerequisites
Section titled “Prerequisites”Before you begin, ensure you have:
- An account with EnforcedFlow (Sign up here)
- Zapier account
- EnforcedFlow and ClickUp connected to your Zapier account (you can do this when setting up the automation)
Connect Your ClickUp Account to Zapier
Section titled “Connect Your ClickUp Account to Zapier”Ensure you have a Zapier account with your ClickUp workspace connected. You’ll need this connection for both automations.
Part 1: Configure EnforcedFlow
Section titled “Part 1: Configure EnforcedFlow”After signing up, you’ll land on the EnforcedFlow dashboard where you can configure your round-robin group.
Create an Advanced Round Robin Group
Section titled “Create an Advanced Round Robin Group”- Navigate to the Advanced Round Robin section in your dashboard
- Click to create a new group
- Give your group a descriptive name (e.g., “ClickUpTaskAssignmentDemo”)

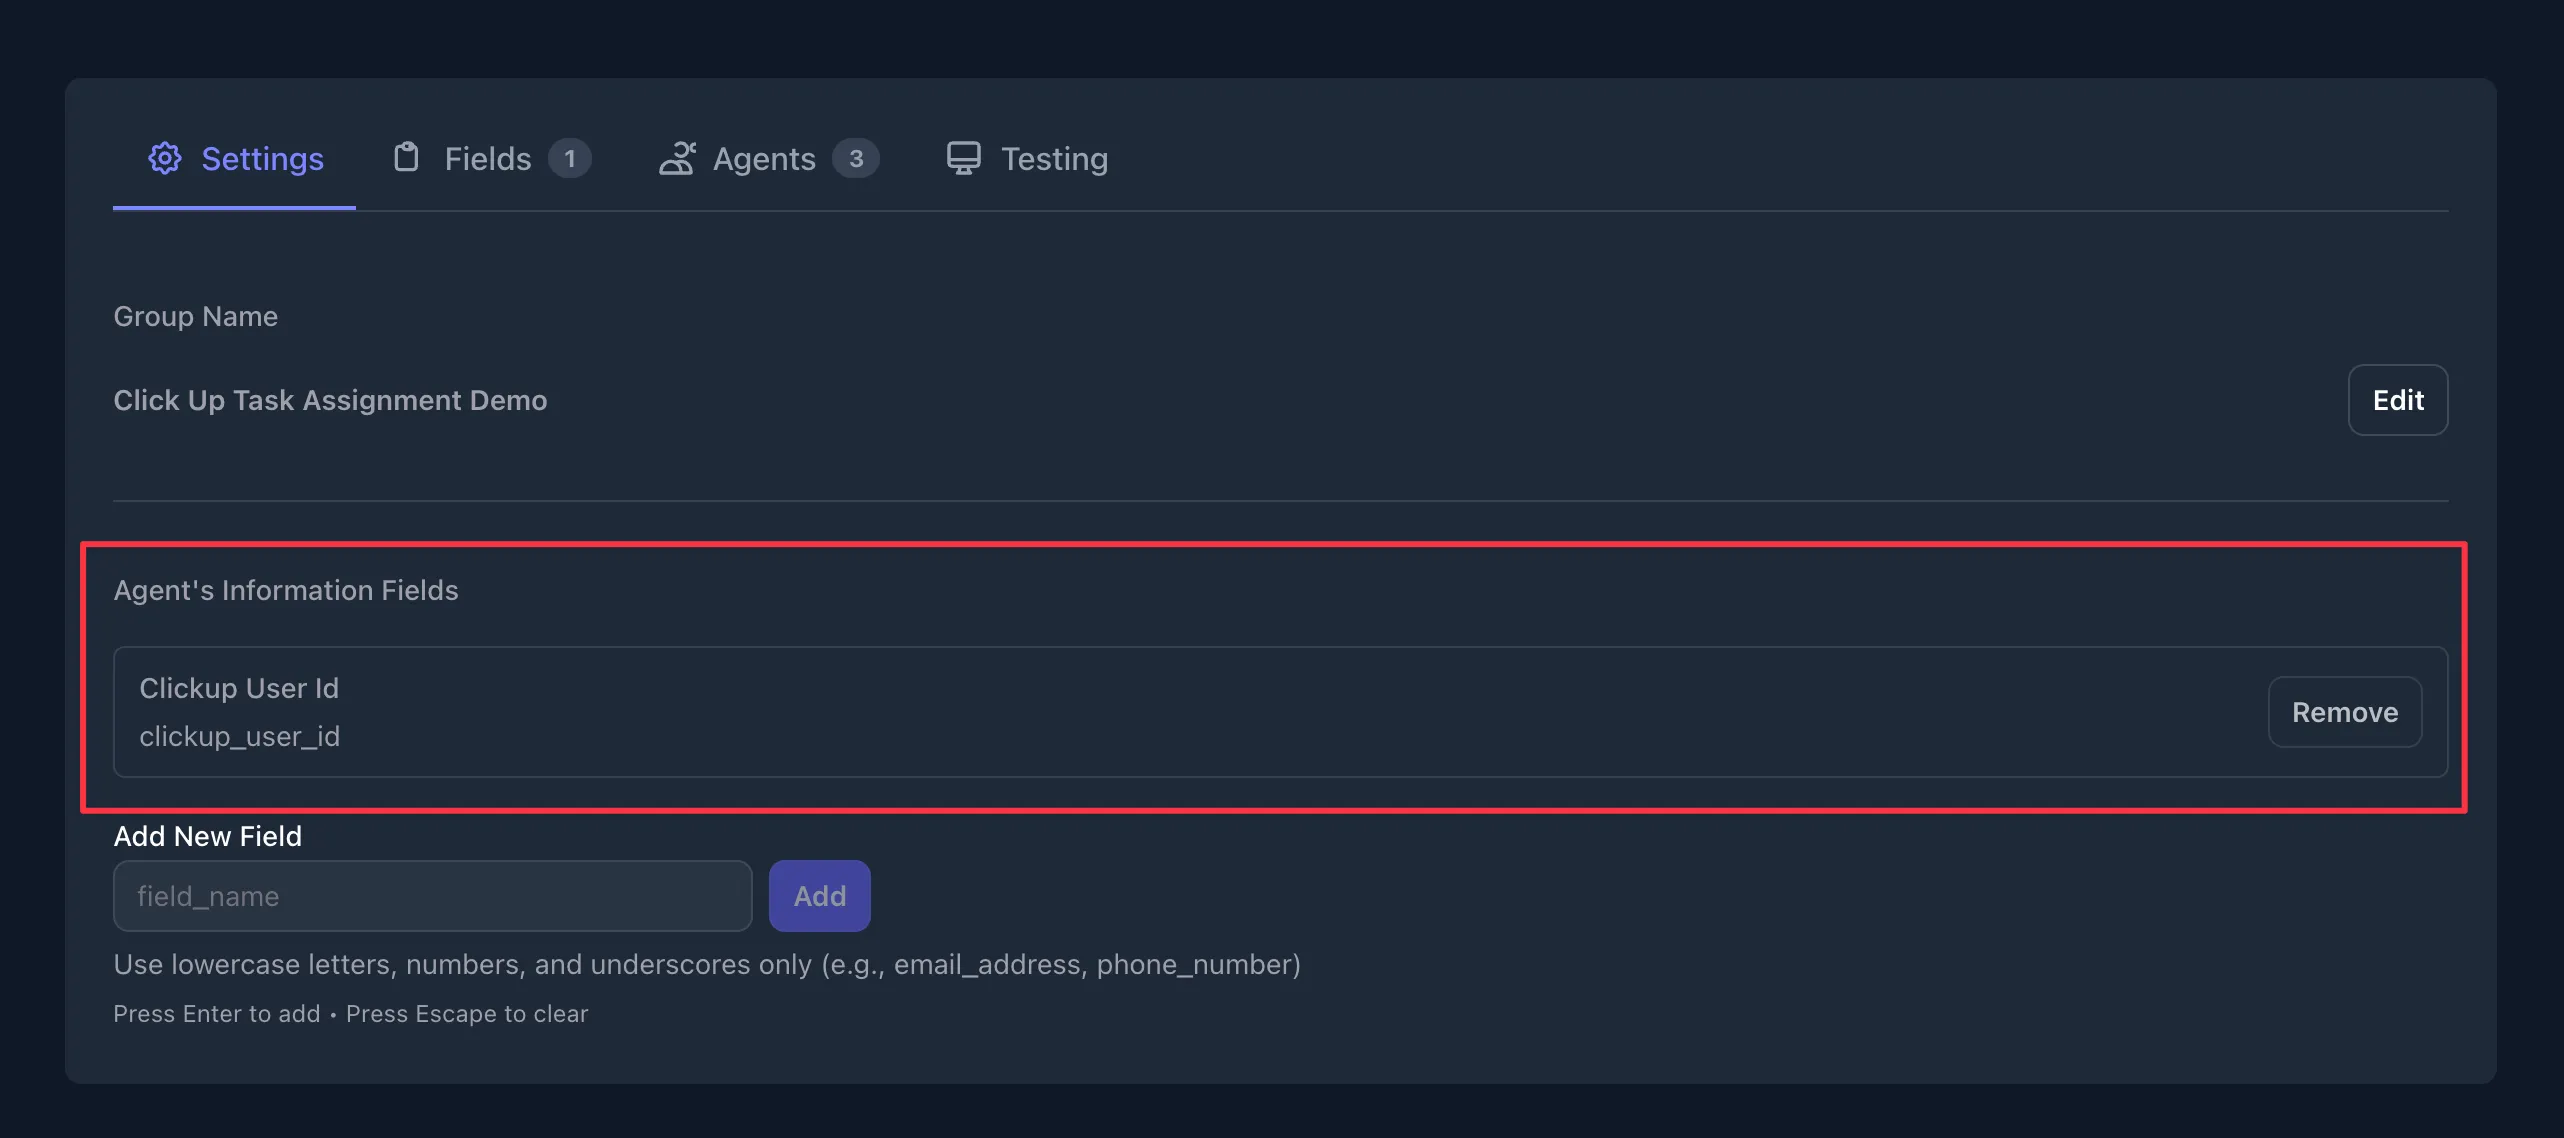
Add Agent Information Fields
Section titled “Add Agent Information Fields”You need to add a field to store each agent’s ClickUp User ID. This allows EnforcedFlow to identify which ClickUp user corresponds to each agent.
- In your group, under the Settings tab, find the Agent’s Information Fields section
- In the Add New Field input, type
clickup_user_id - Click Add
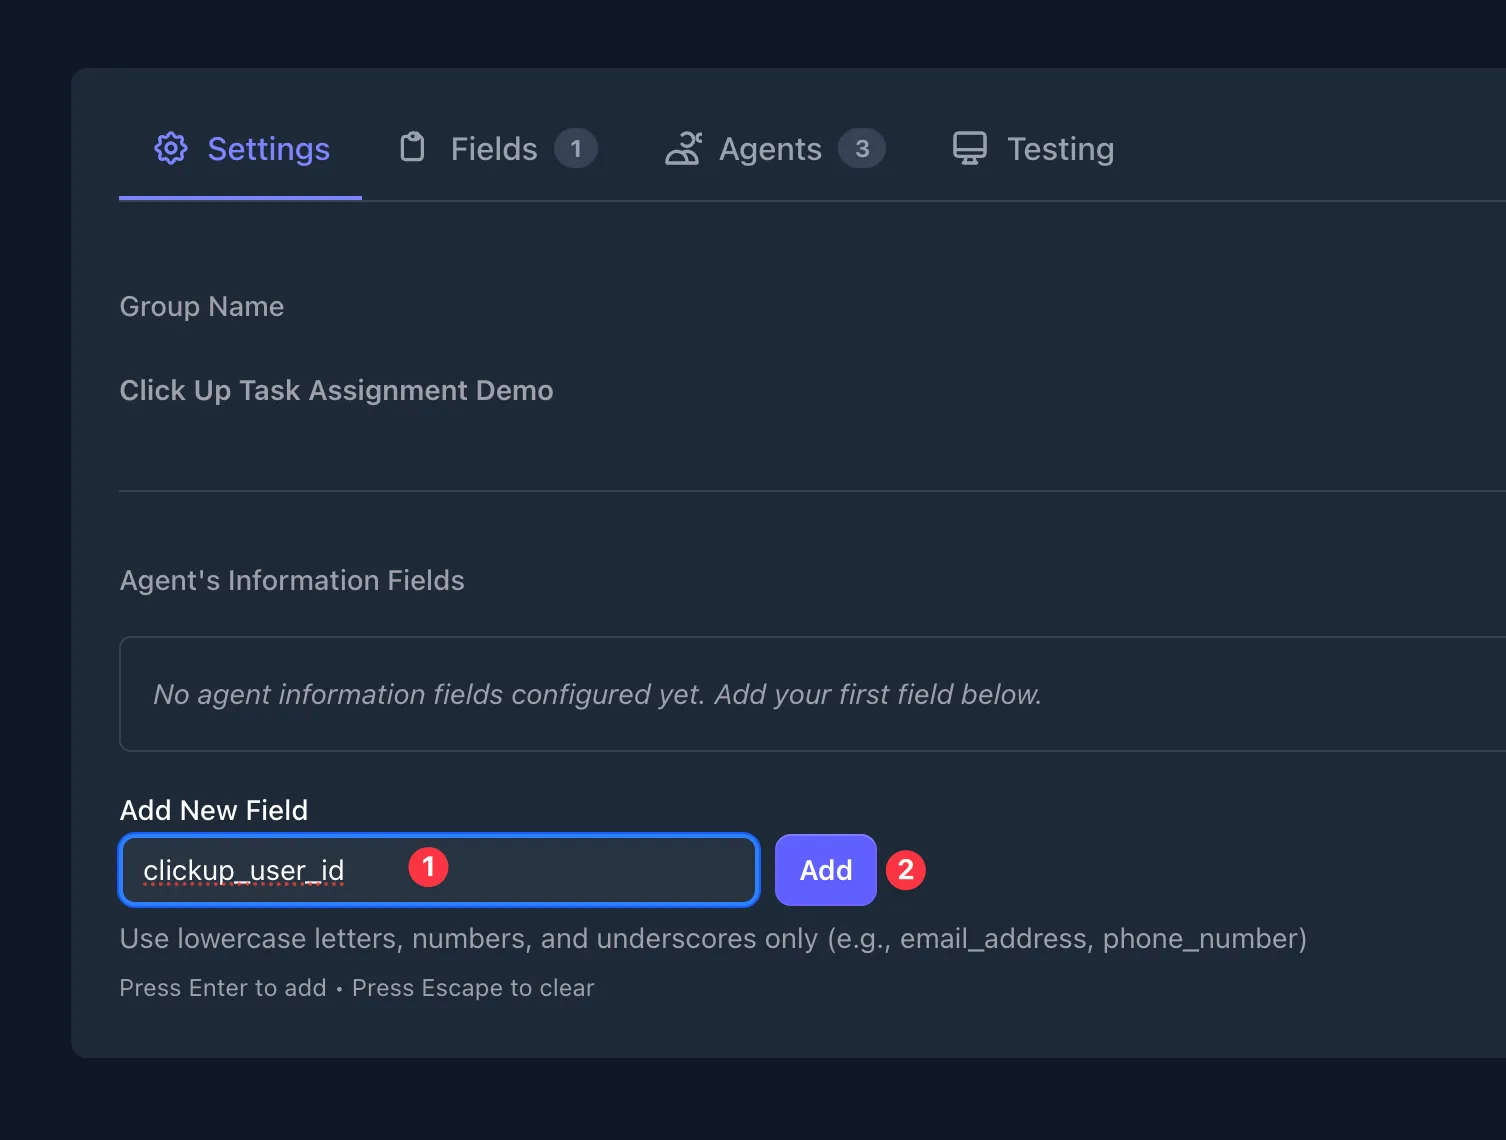
Once added, you’ll see the field listed under Agent’s Information Fields.
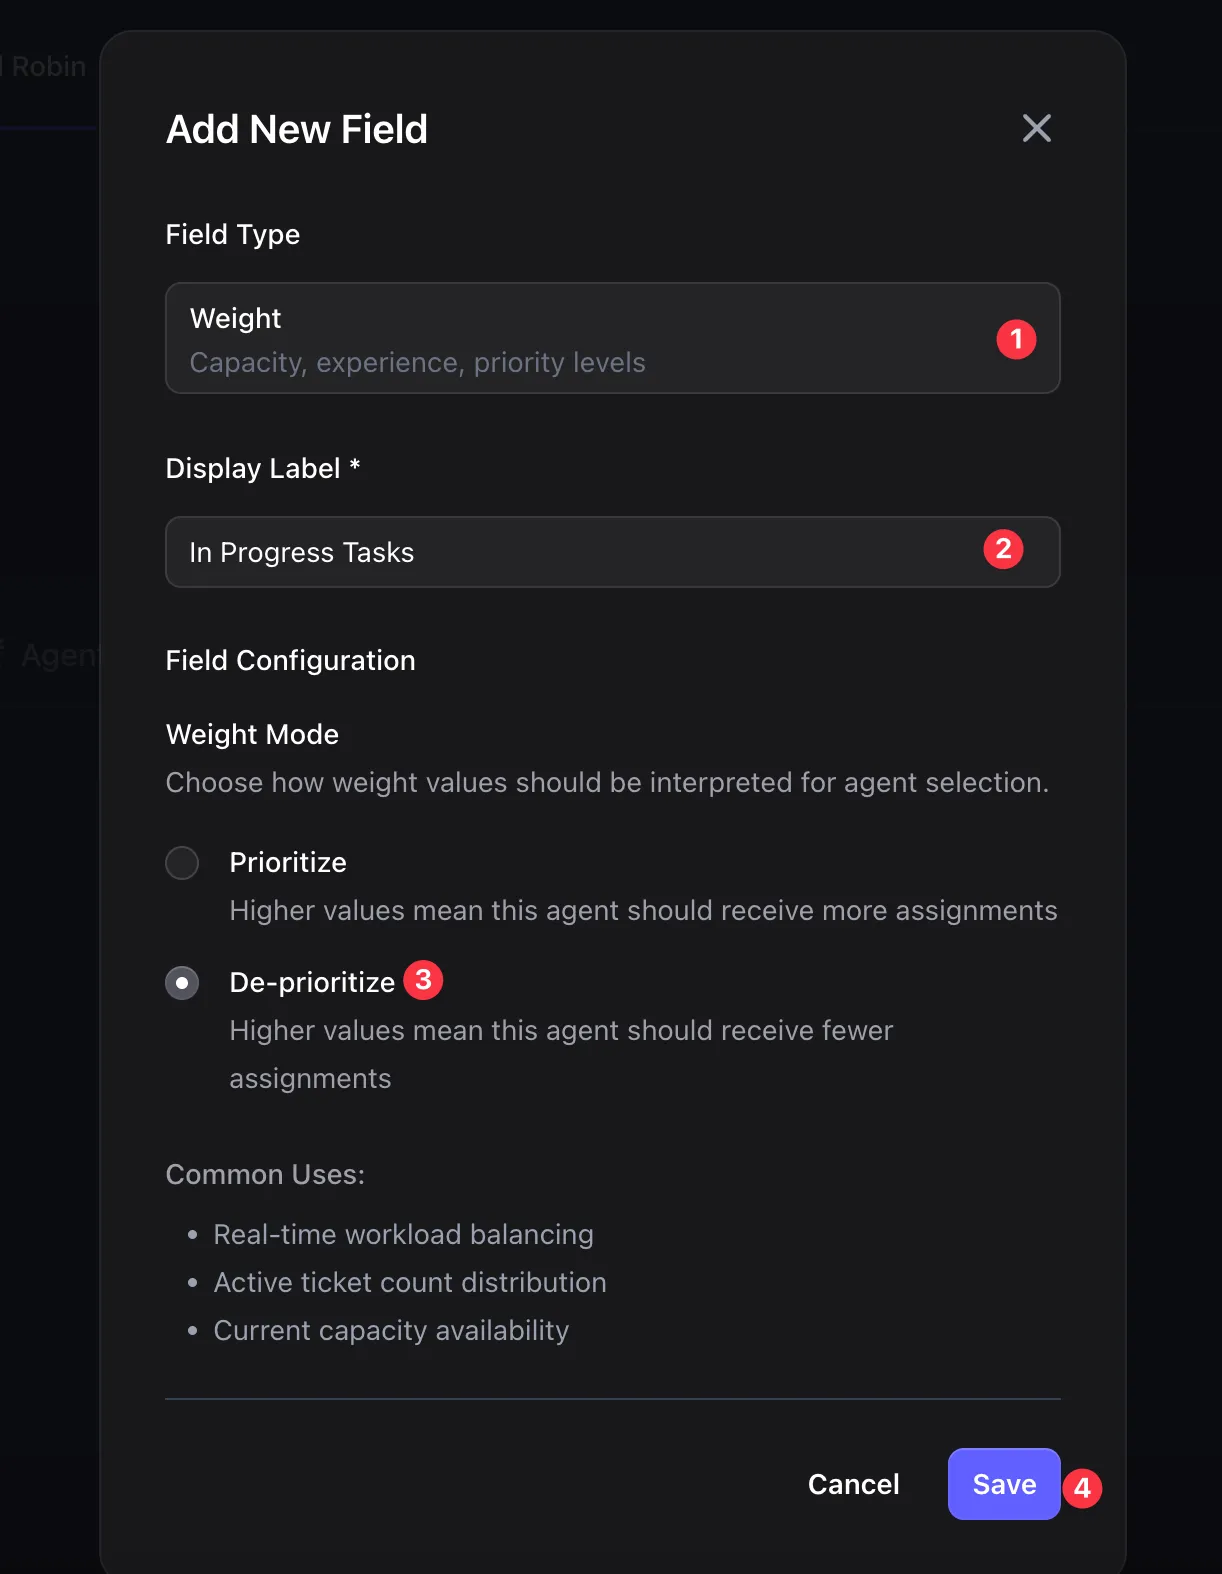
Add a Weight Field for Workload Tracking
Section titled “Add a Weight Field for Workload Tracking”Now switch to the Fields tab to add a weight field for workload tracking.
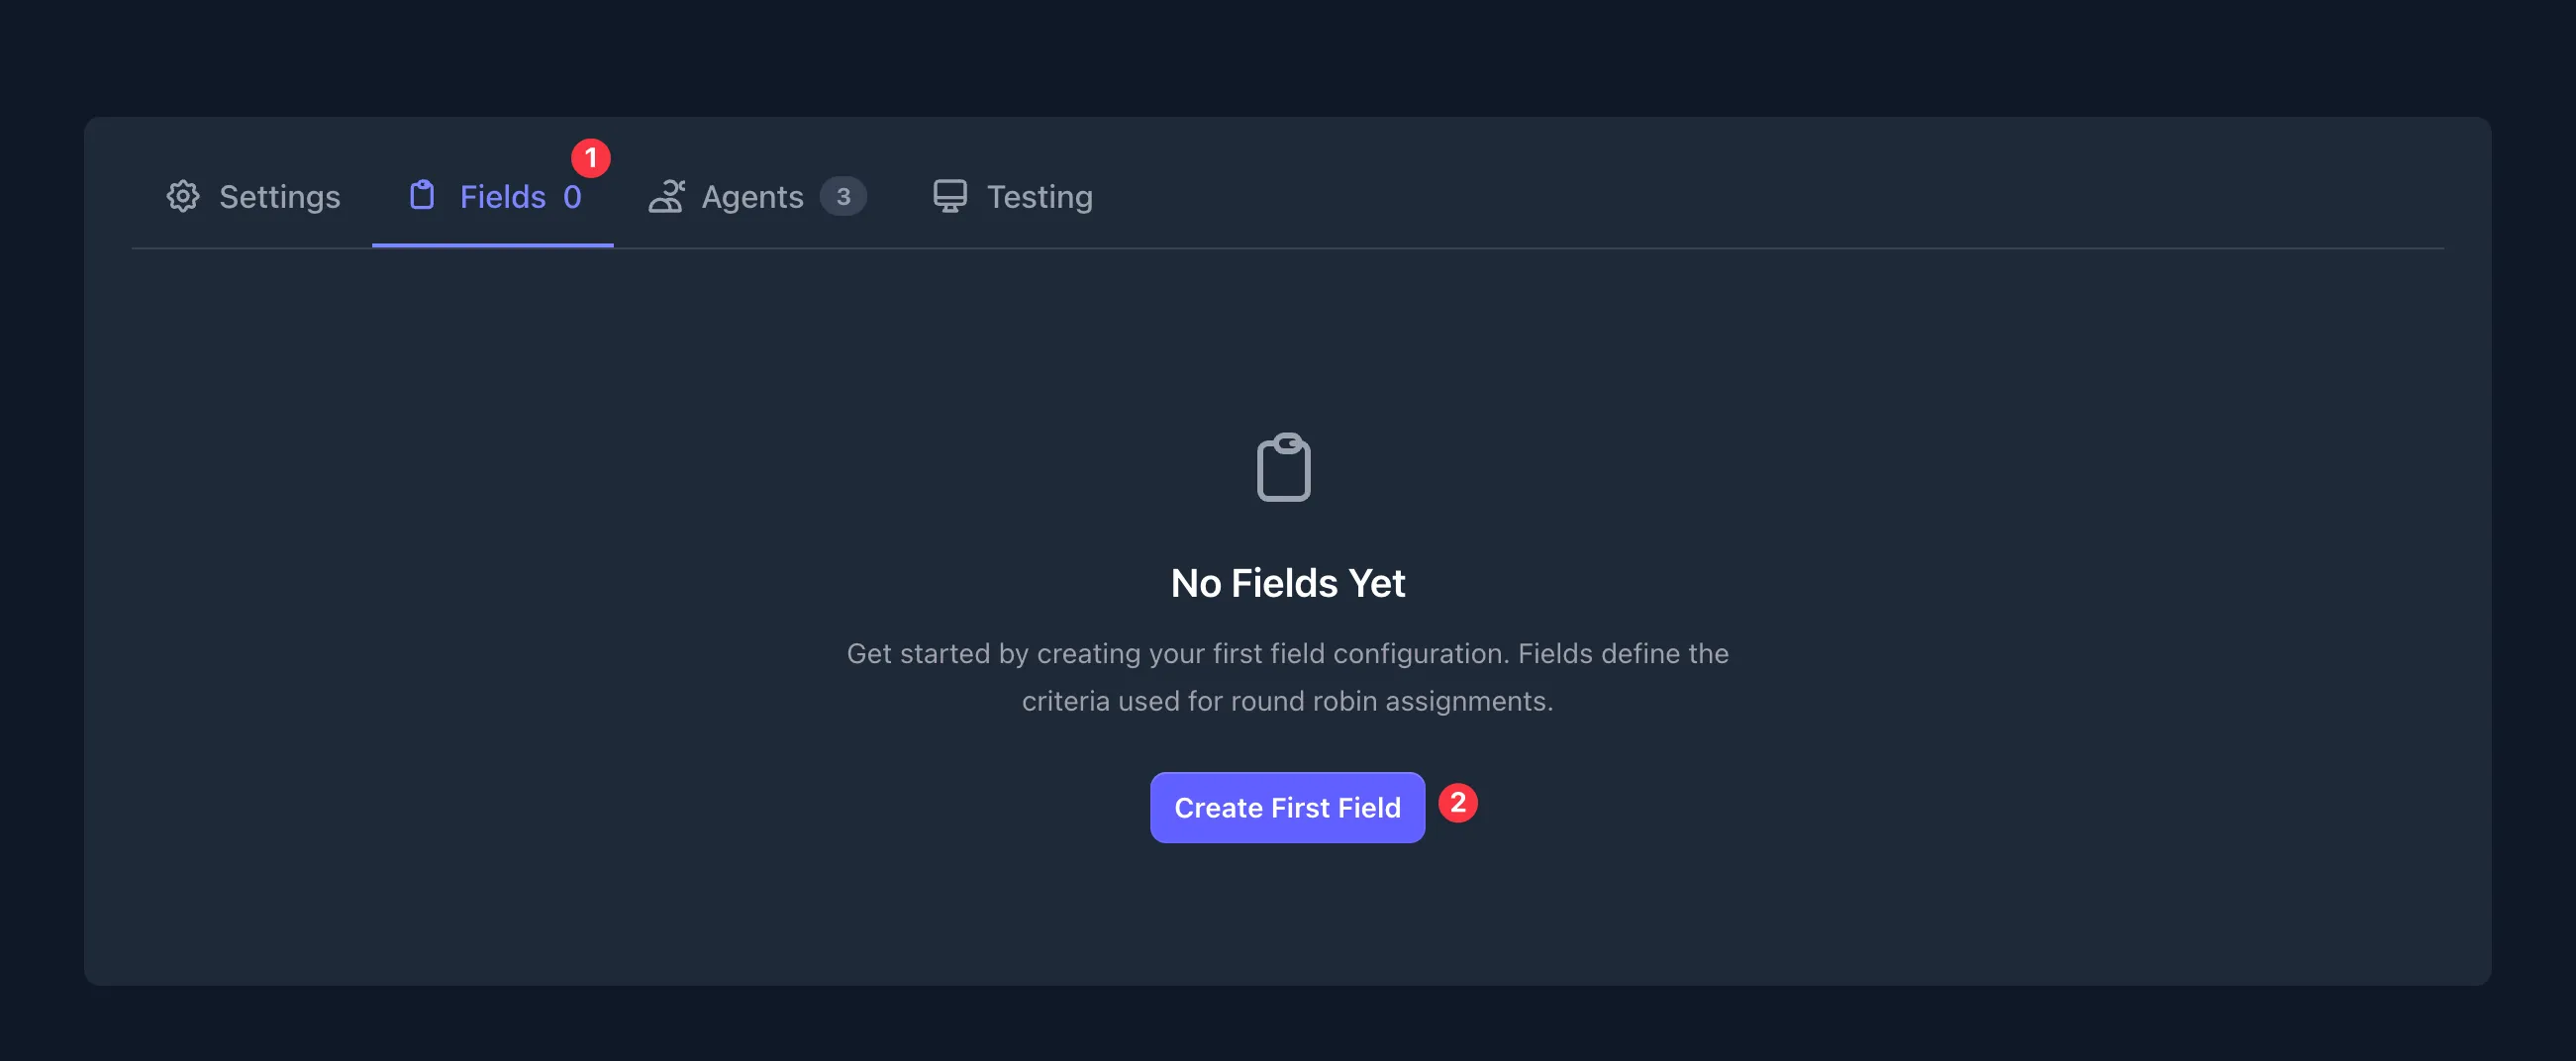
- Click Create First Field
- Select Weight as the Field Type
- Set Display Label to
In Progress Tasks - Select De-prioritize as the Weight Mode
- Click Save
Understanding Weight Modes: Weight fields control agent prioritization. Prioritize means higher values receive more assignments (useful for seniority). De-prioritize means higher values receive fewer assignments (ideal for workload balancing). With De-prioritize, agents with more in-progress tasks will be deprioritized, and agents with fewer tasks will receive new assignments first.
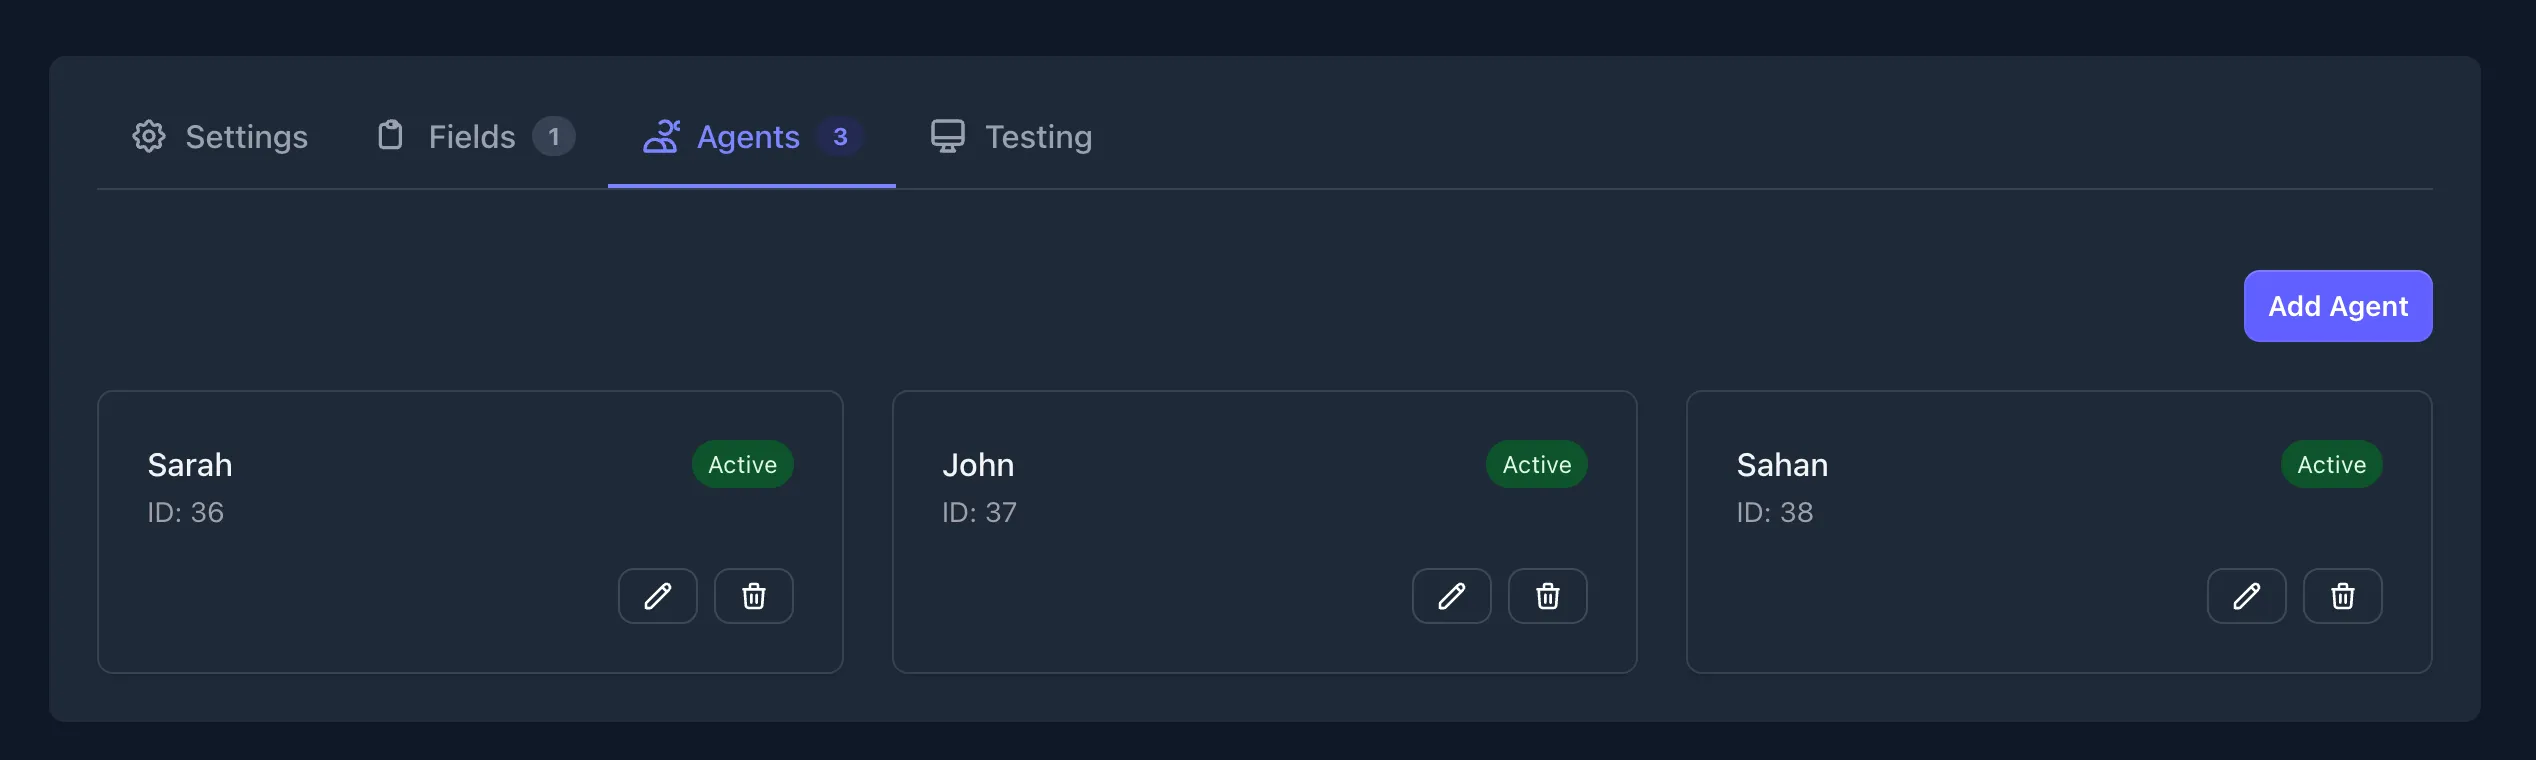
Add Your Agents
Section titled “Add Your Agents”Switch to the Agents tab to add your team members. Click Add Agent to open the agent form.

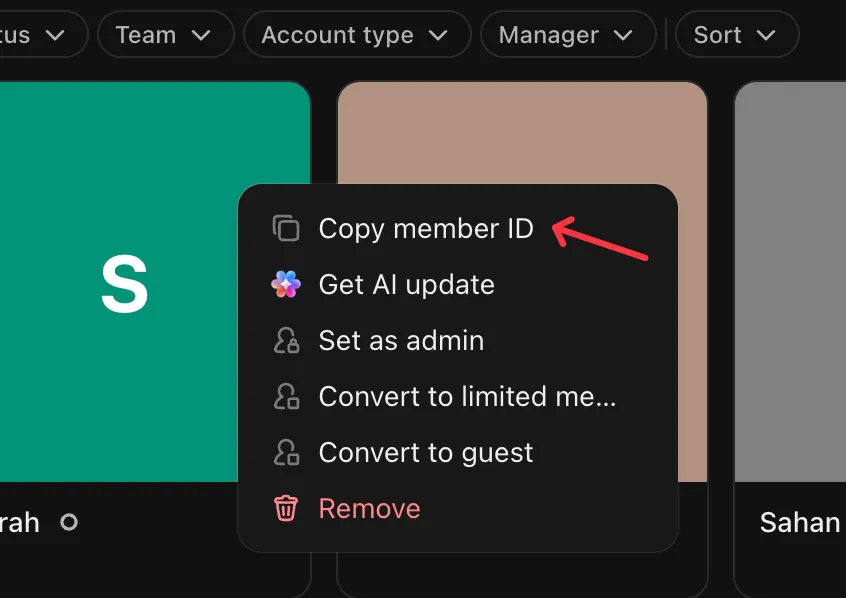
Finding ClickUp User IDs
Section titled “Finding ClickUp User IDs”Before adding agents, you’ll need each team member’s ClickUp User ID. To get it:
- Log into ClickUp
- Click Teams in the left sidebar
- Select All People to see all workspace members
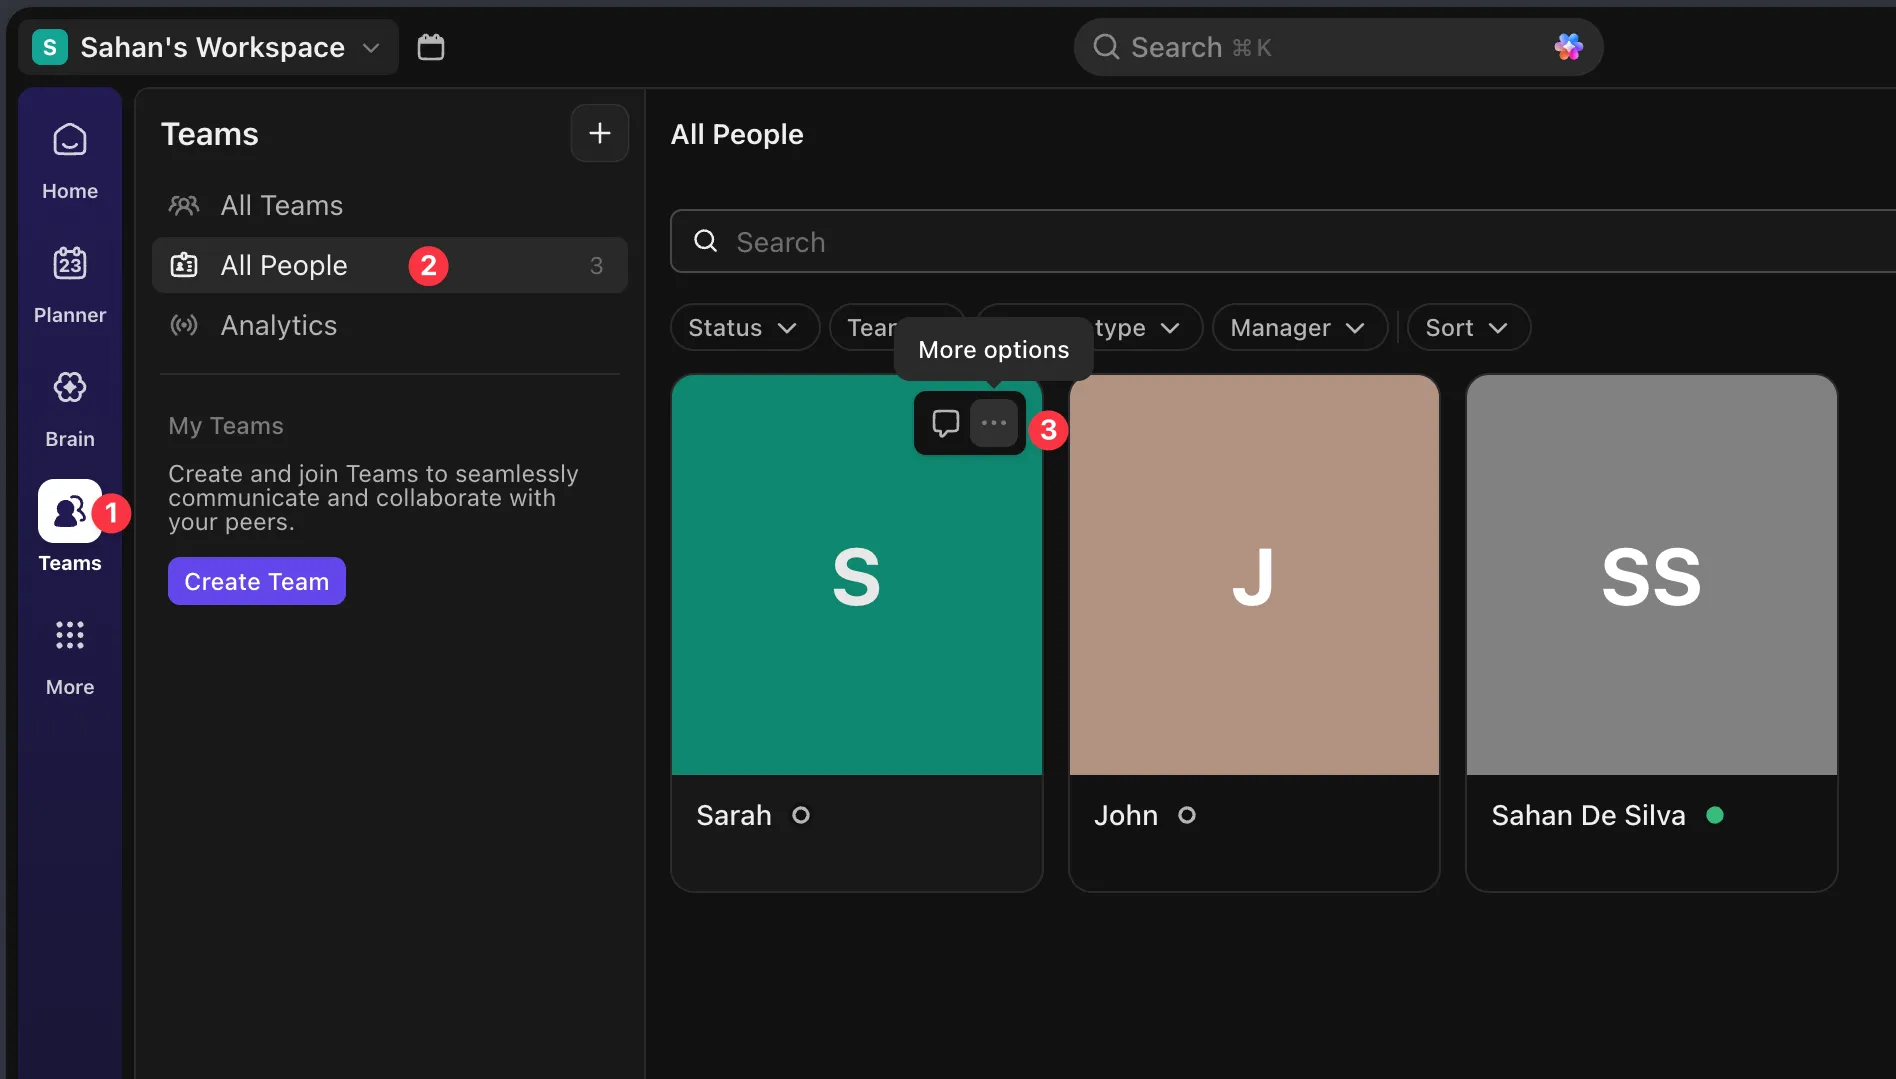
- Click the more options (three dots) on a team member’s card
- Select Copy member ID
Adding an Agent
Section titled “Adding an Agent”For each team member, fill in the Add New Agent form:
- Enter the Agent Name (e.g., “Sarah”)
- Paste the Clickup User Id you copied
- Set the In Progress Tasks weight value to
1(starting value) - Click Add Agent
Repeat for all agents in your team.
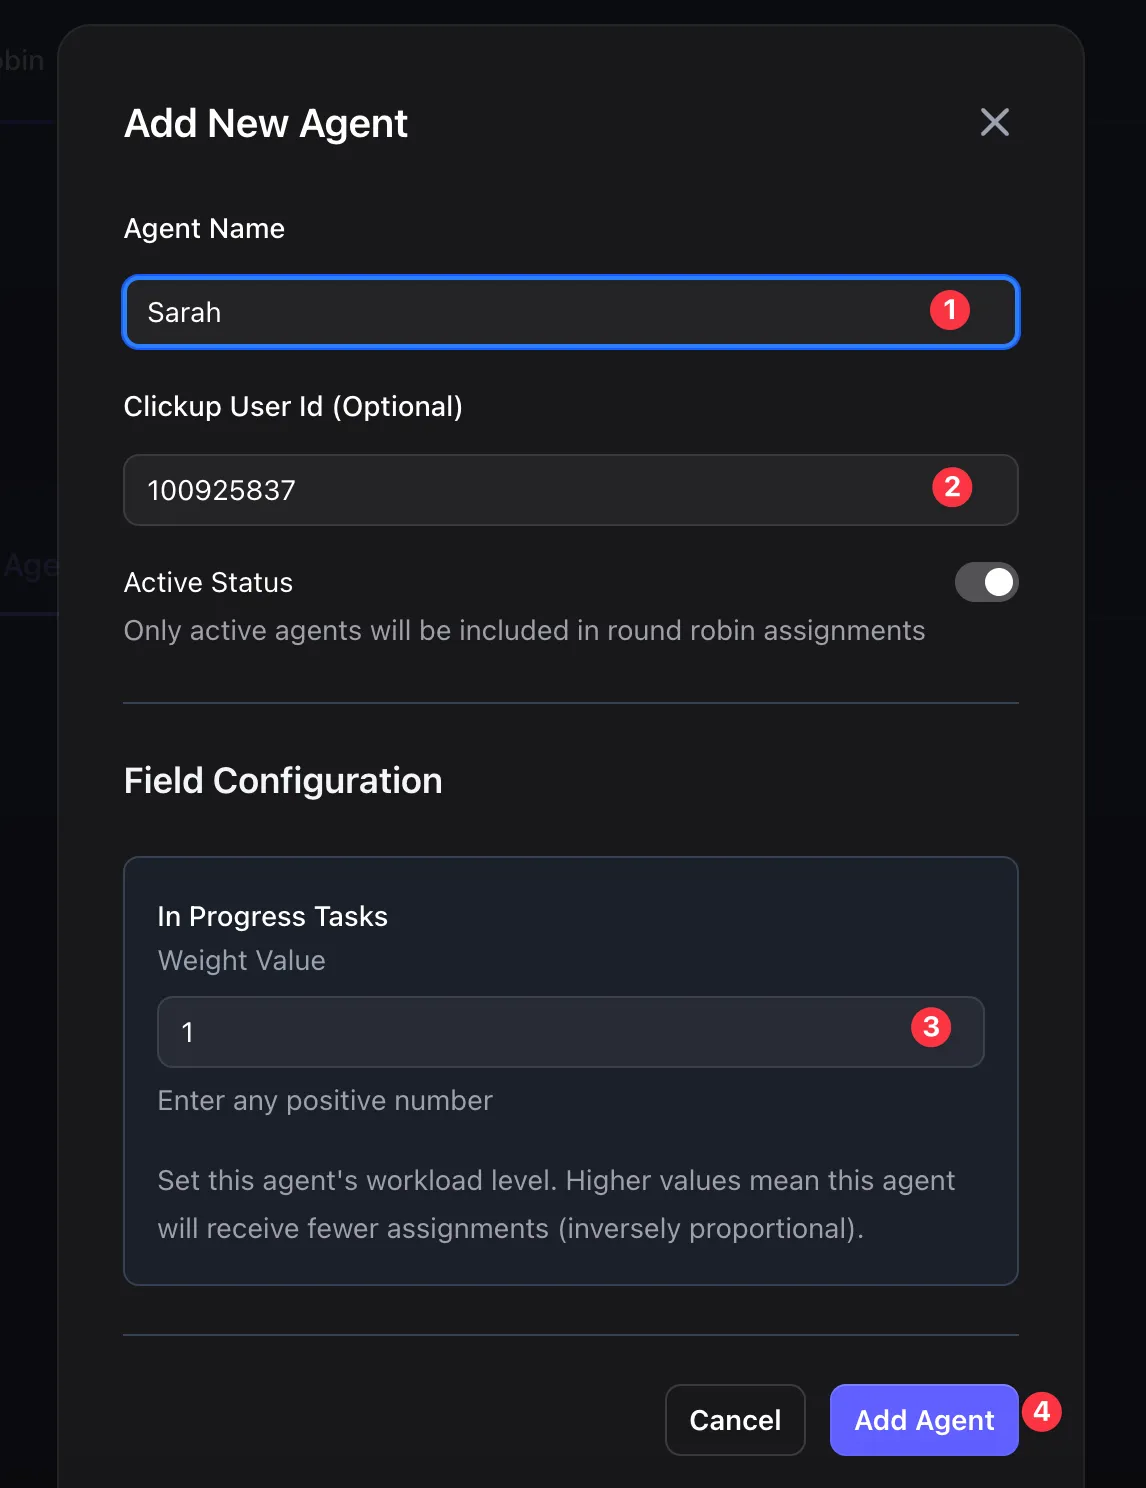
Once done, you’ll see all agents listed.
Part 2: Automation 1 - Assign Tasks on Creation
Section titled “Part 2: Automation 1 - Assign Tasks on Creation”This automation triggers when a new task is created in ClickUp and assigns it to the next available agent.
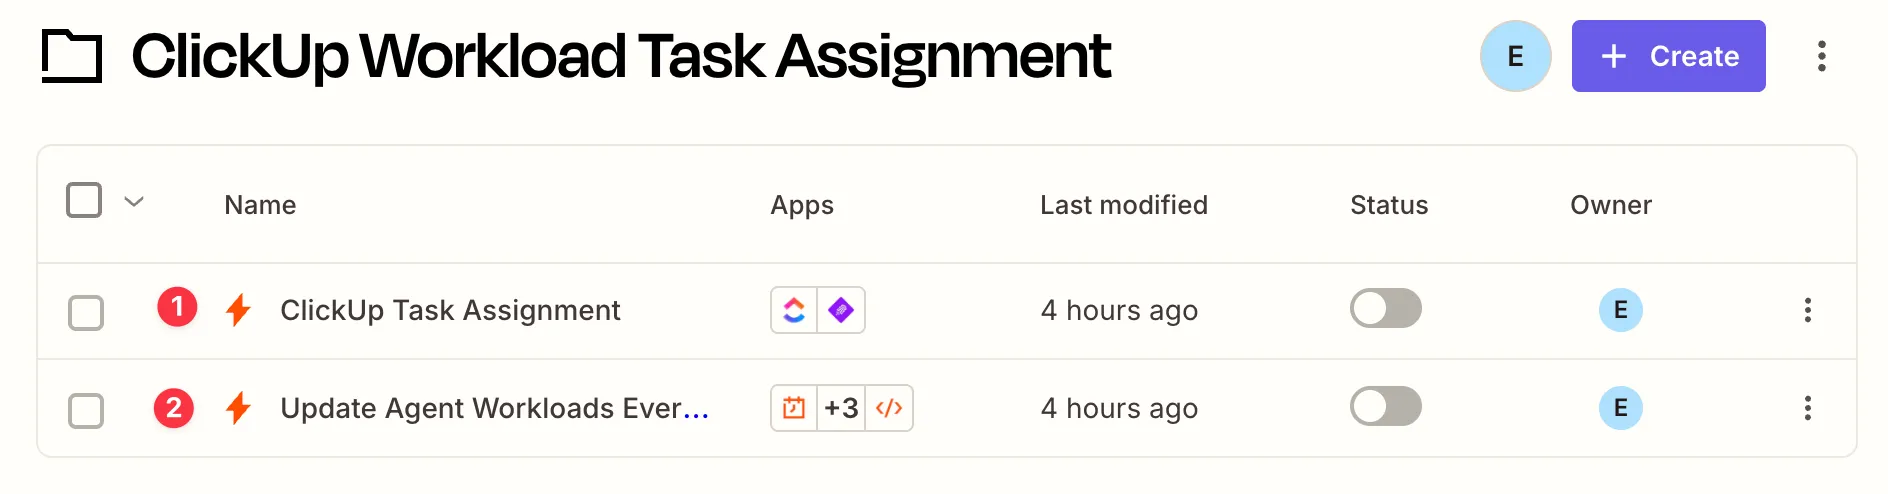
We recommend creating a folder in Zapier to organize both automations.
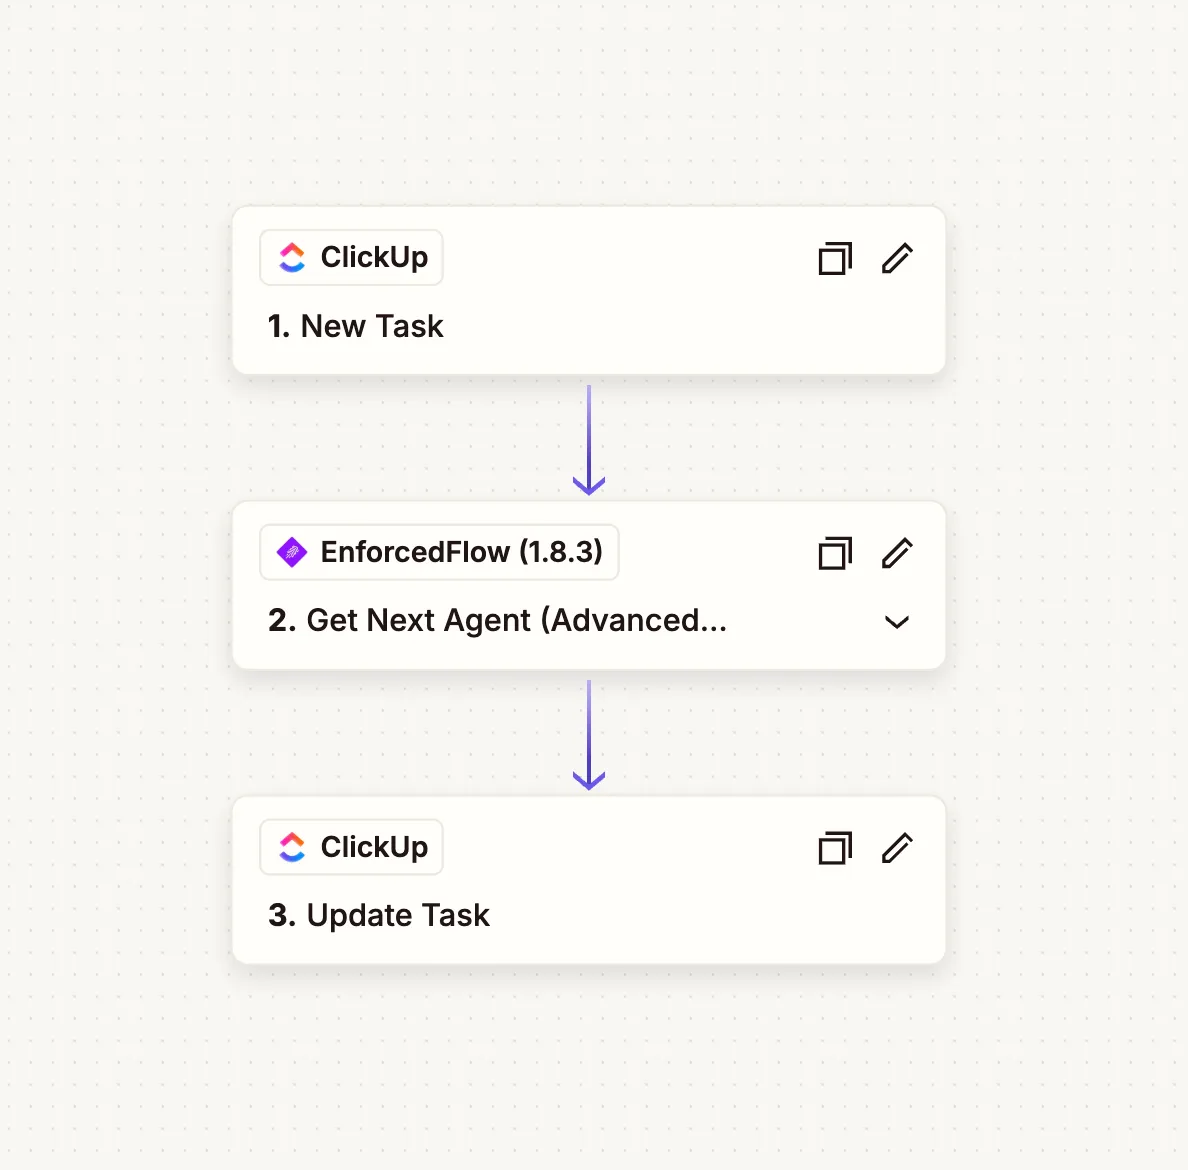
The completed automation flow looks like this:
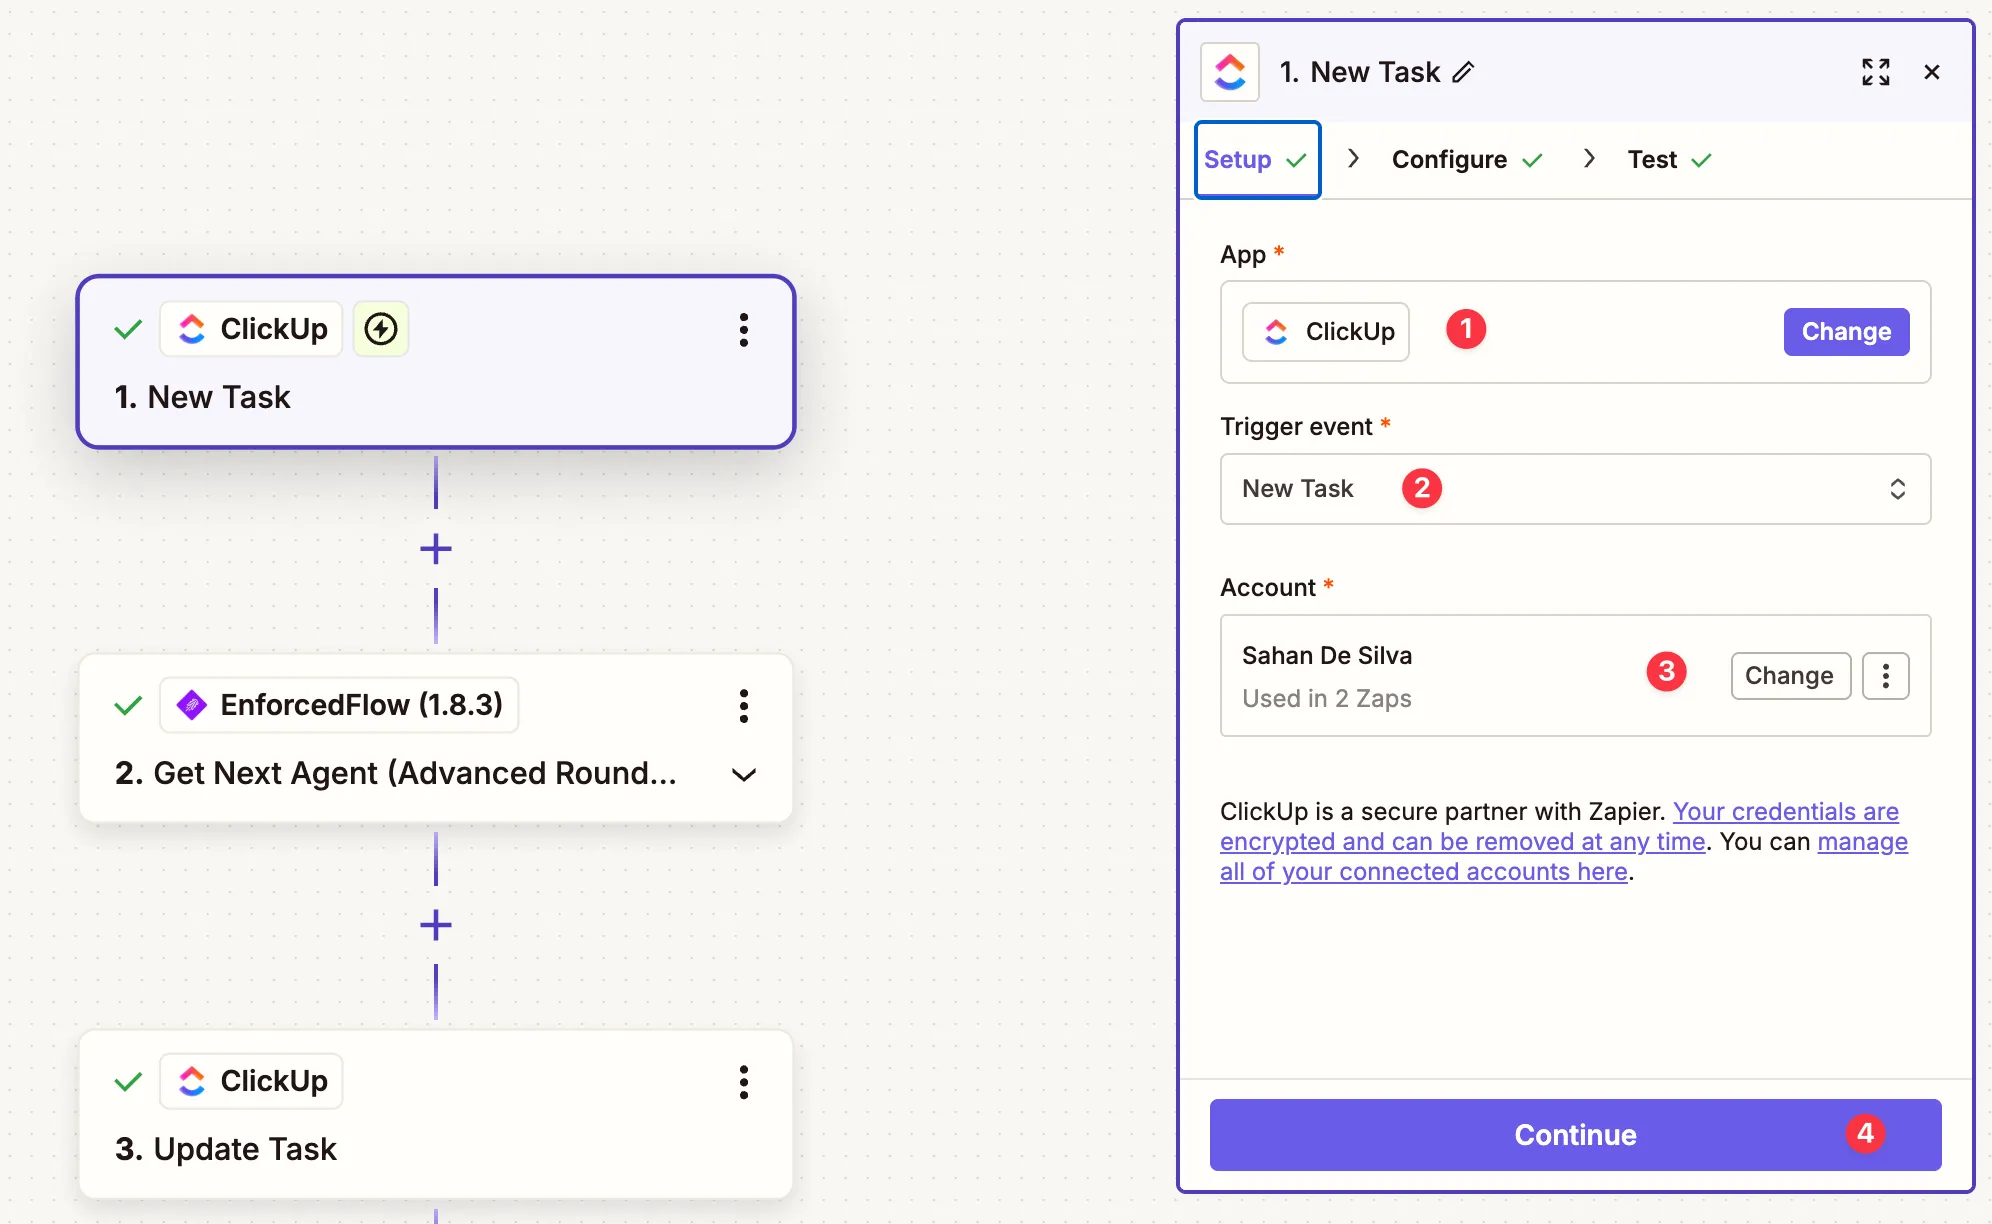
Step 1: Set Up the ClickUp Trigger
Section titled “Step 1: Set Up the ClickUp Trigger”- Create a new Zap in Zapier
- Select ClickUp as the app
- Choose New Task as the trigger event
- Connect your ClickUp account
- Click Continue
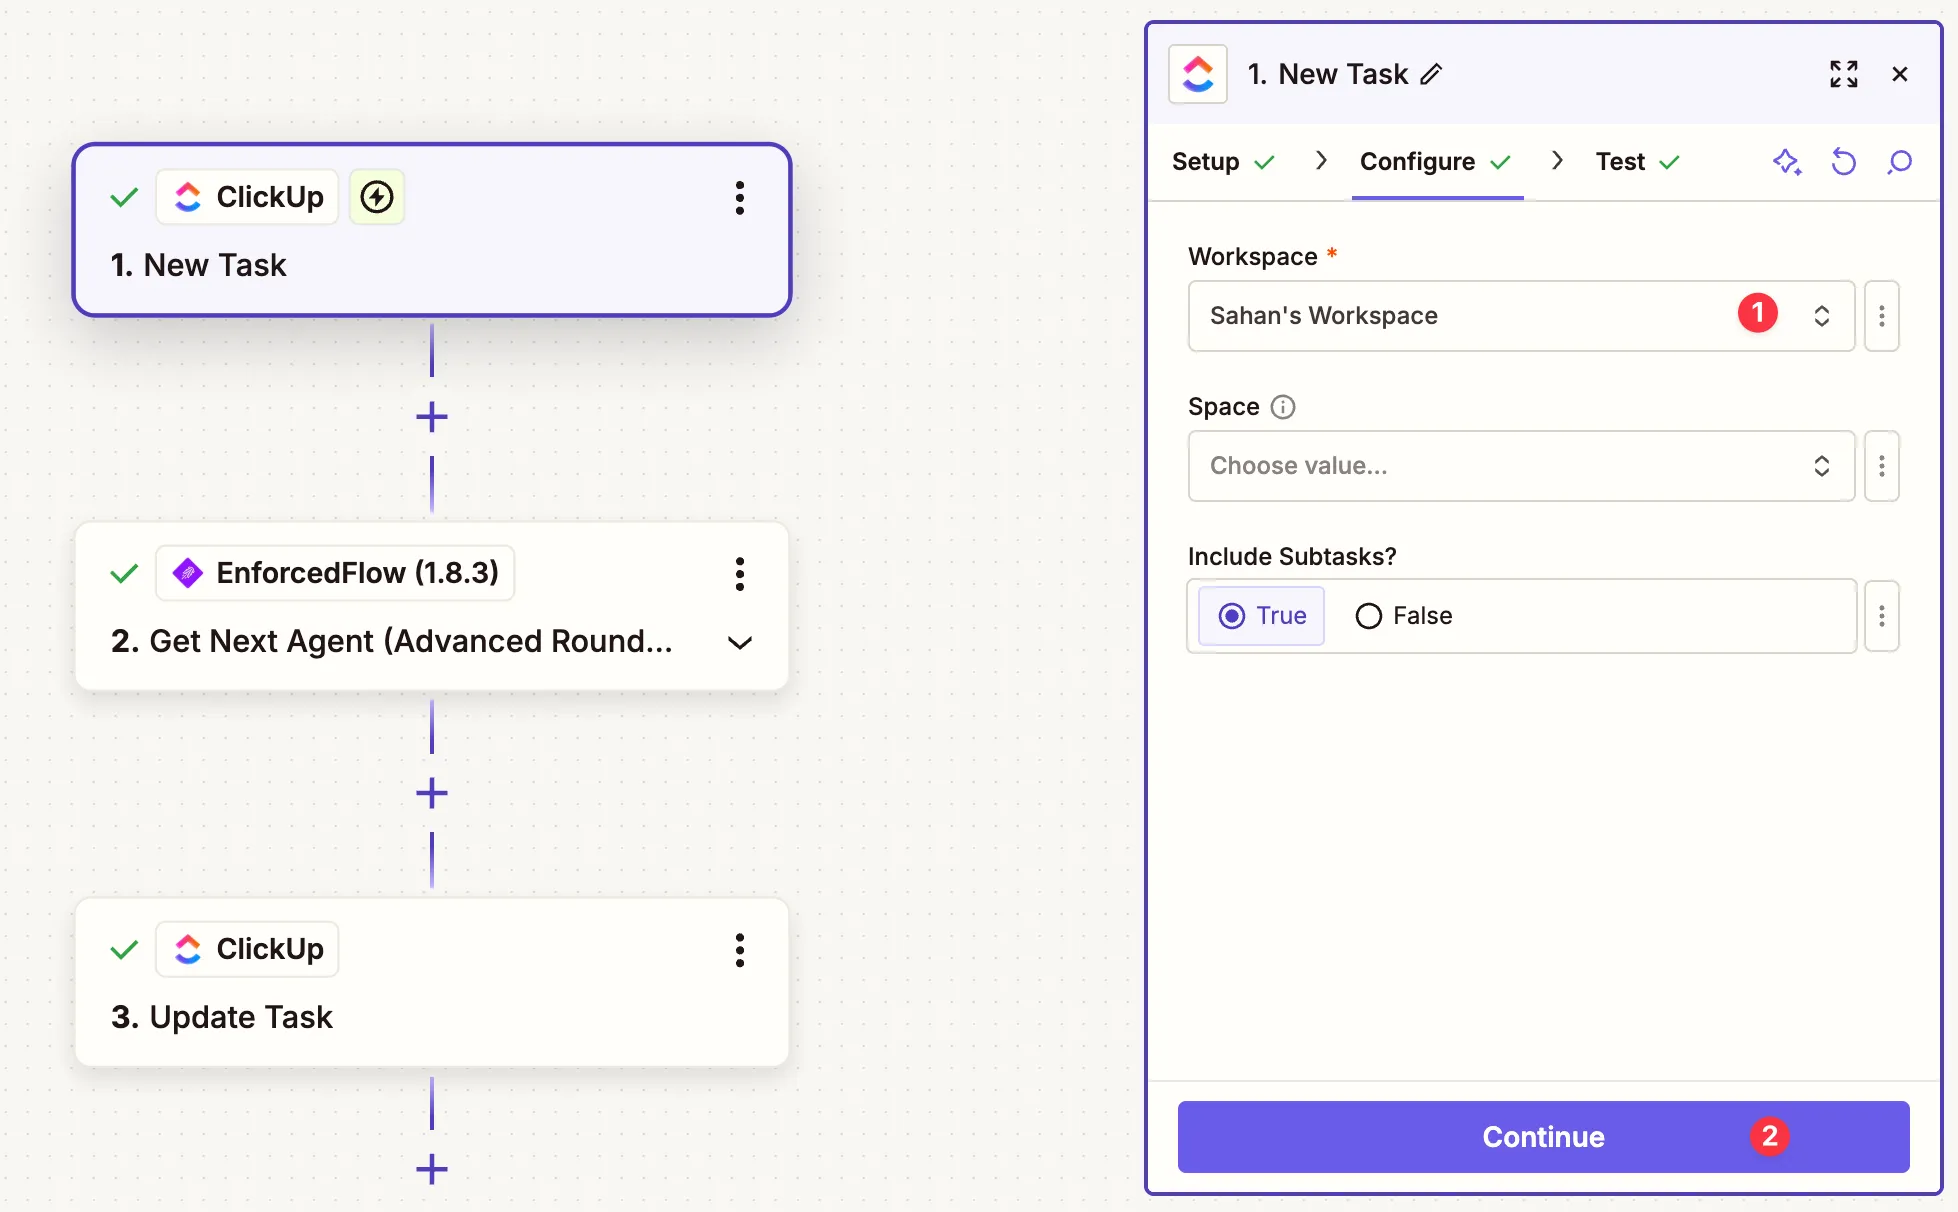
Configure the Trigger
Section titled “Configure the Trigger”- Select your Workspace
- Optionally select a Space to limit the scope (leave empty to track all tasks)
- Set Include Subtasks to True if needed
- Click Continue
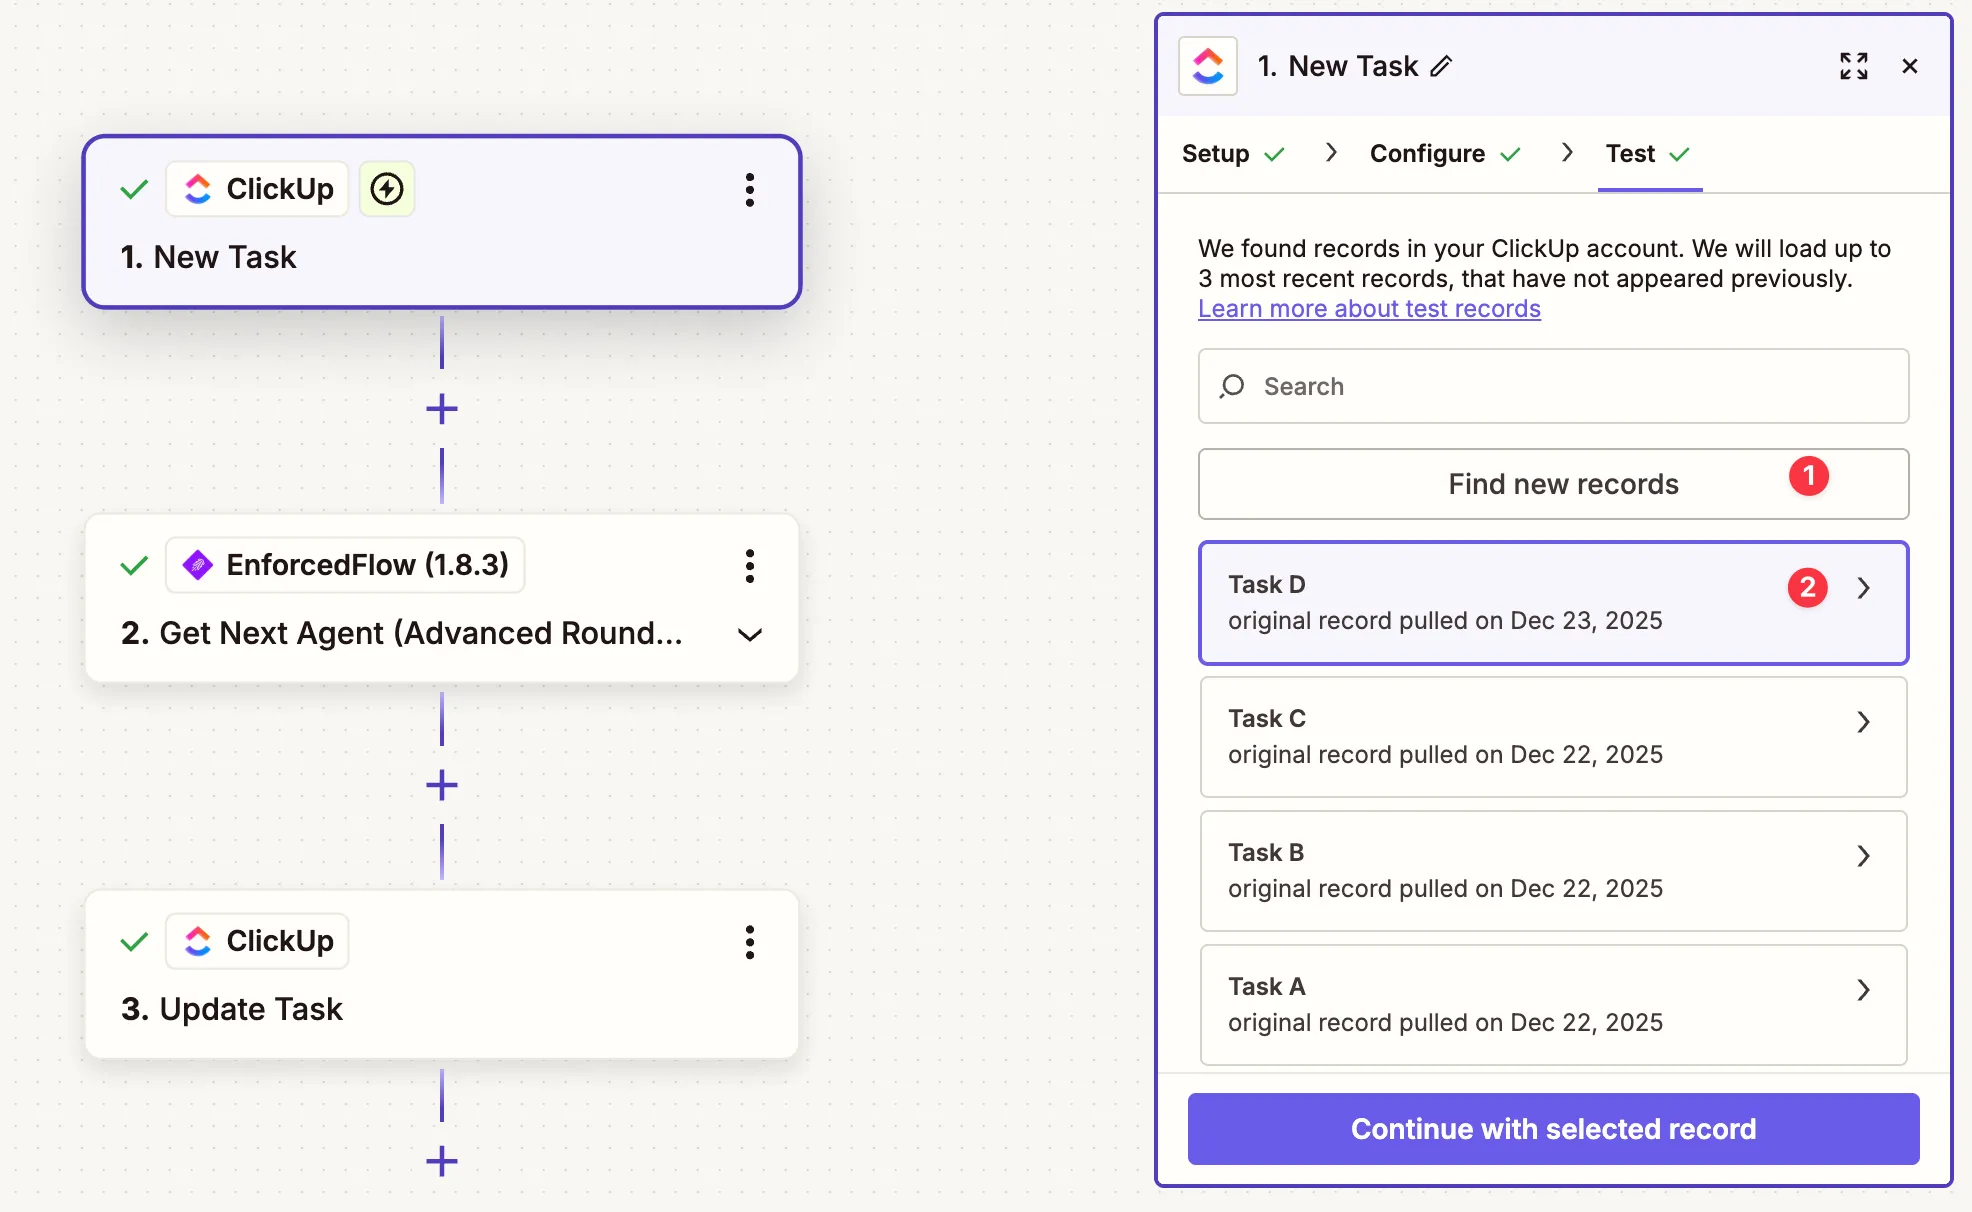
Test the Trigger
Section titled “Test the Trigger”- Click Find new records to pull recent tasks from ClickUp
- Select a test task from the list
- Click Continue with selected record
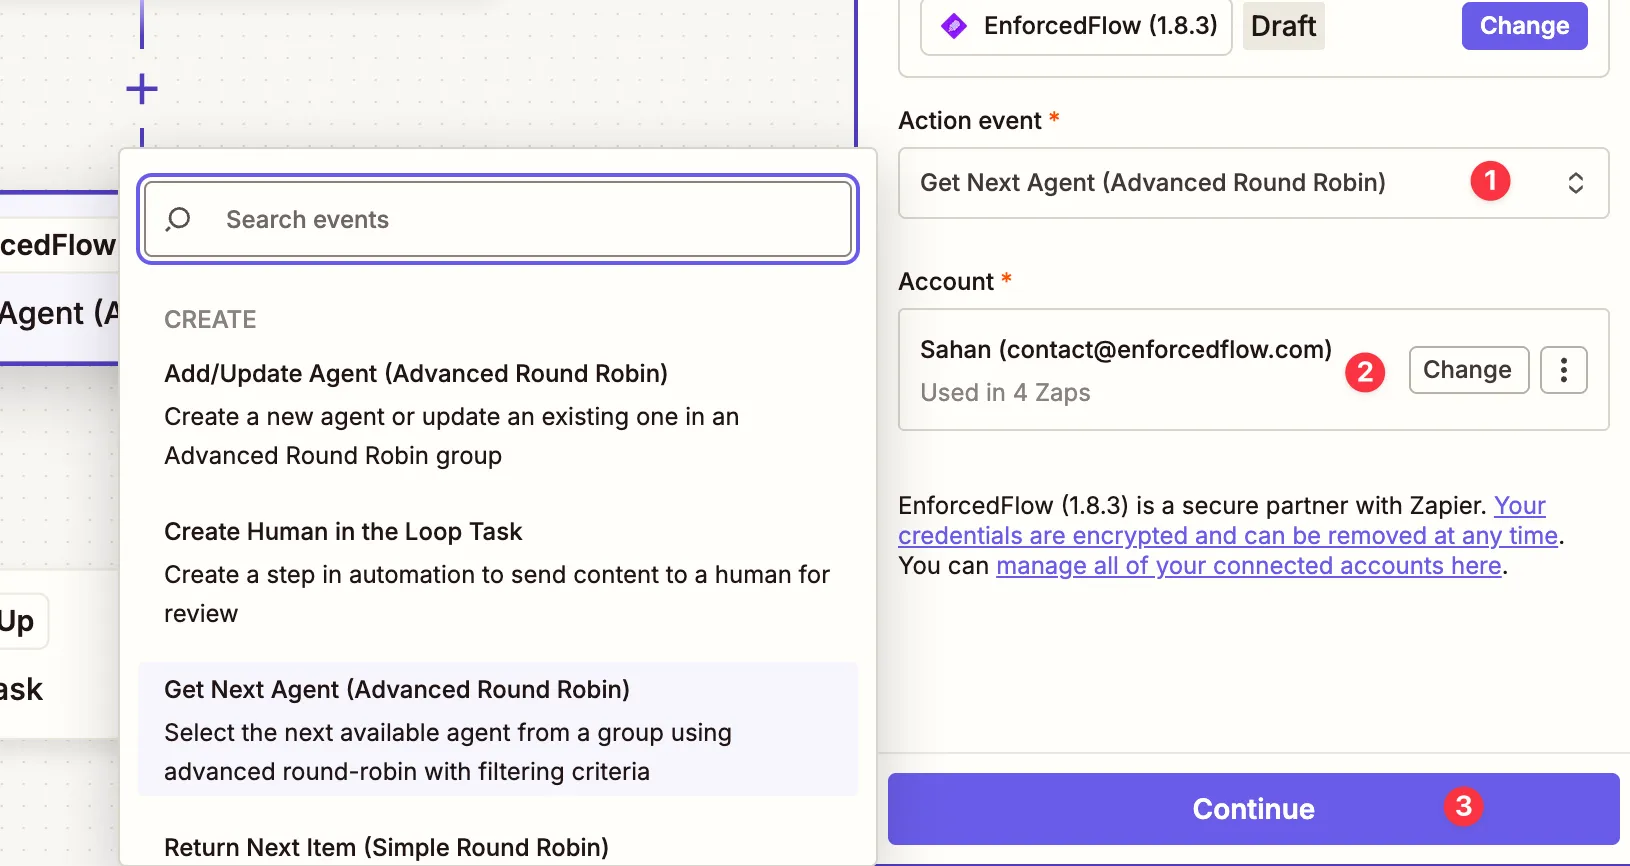
Step 2: Add the EnforcedFlow Action
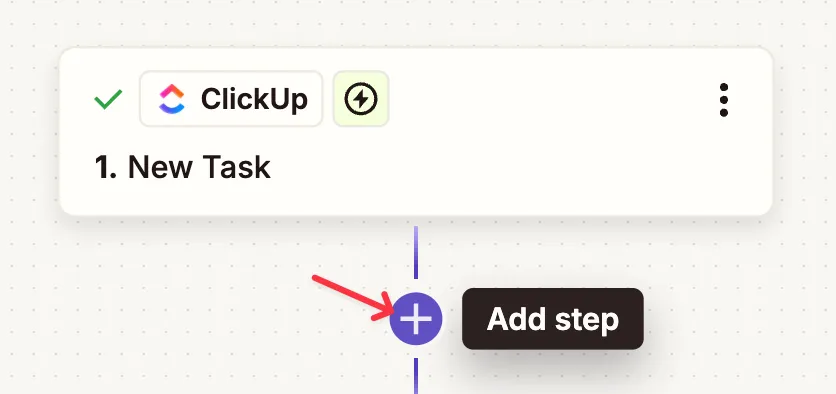
Section titled “Step 2: Add the EnforcedFlow Action”Click the + button to add a new step.
- Search for EnforcedFlow
- Select EnforcedFlow from the results
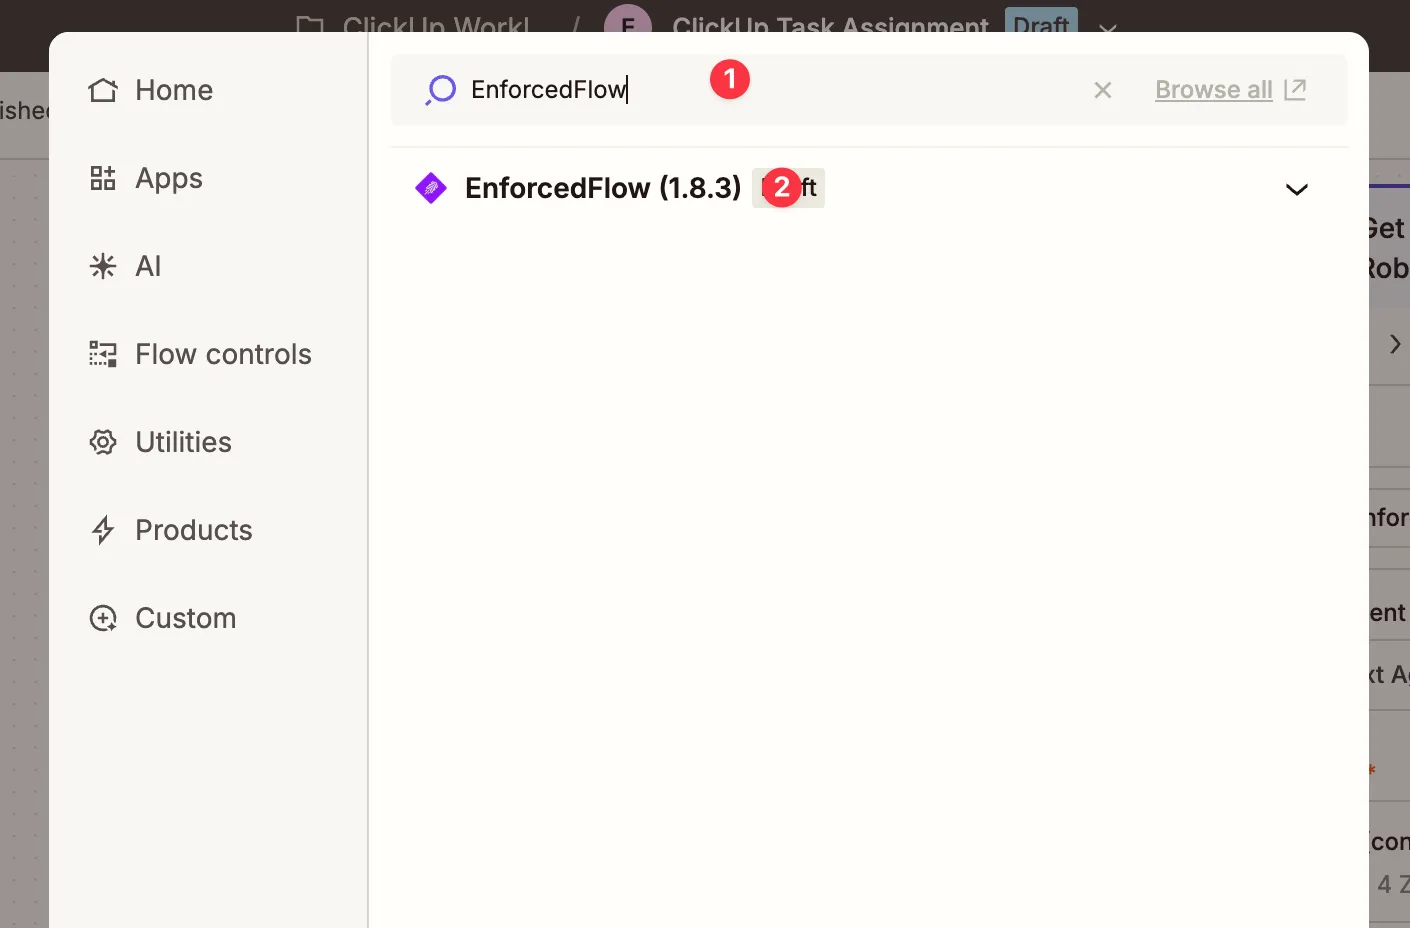
- Select Get Next Agent (Advanced Round Robin) as the action
- Connect your EnforcedFlow account
- Click Continue
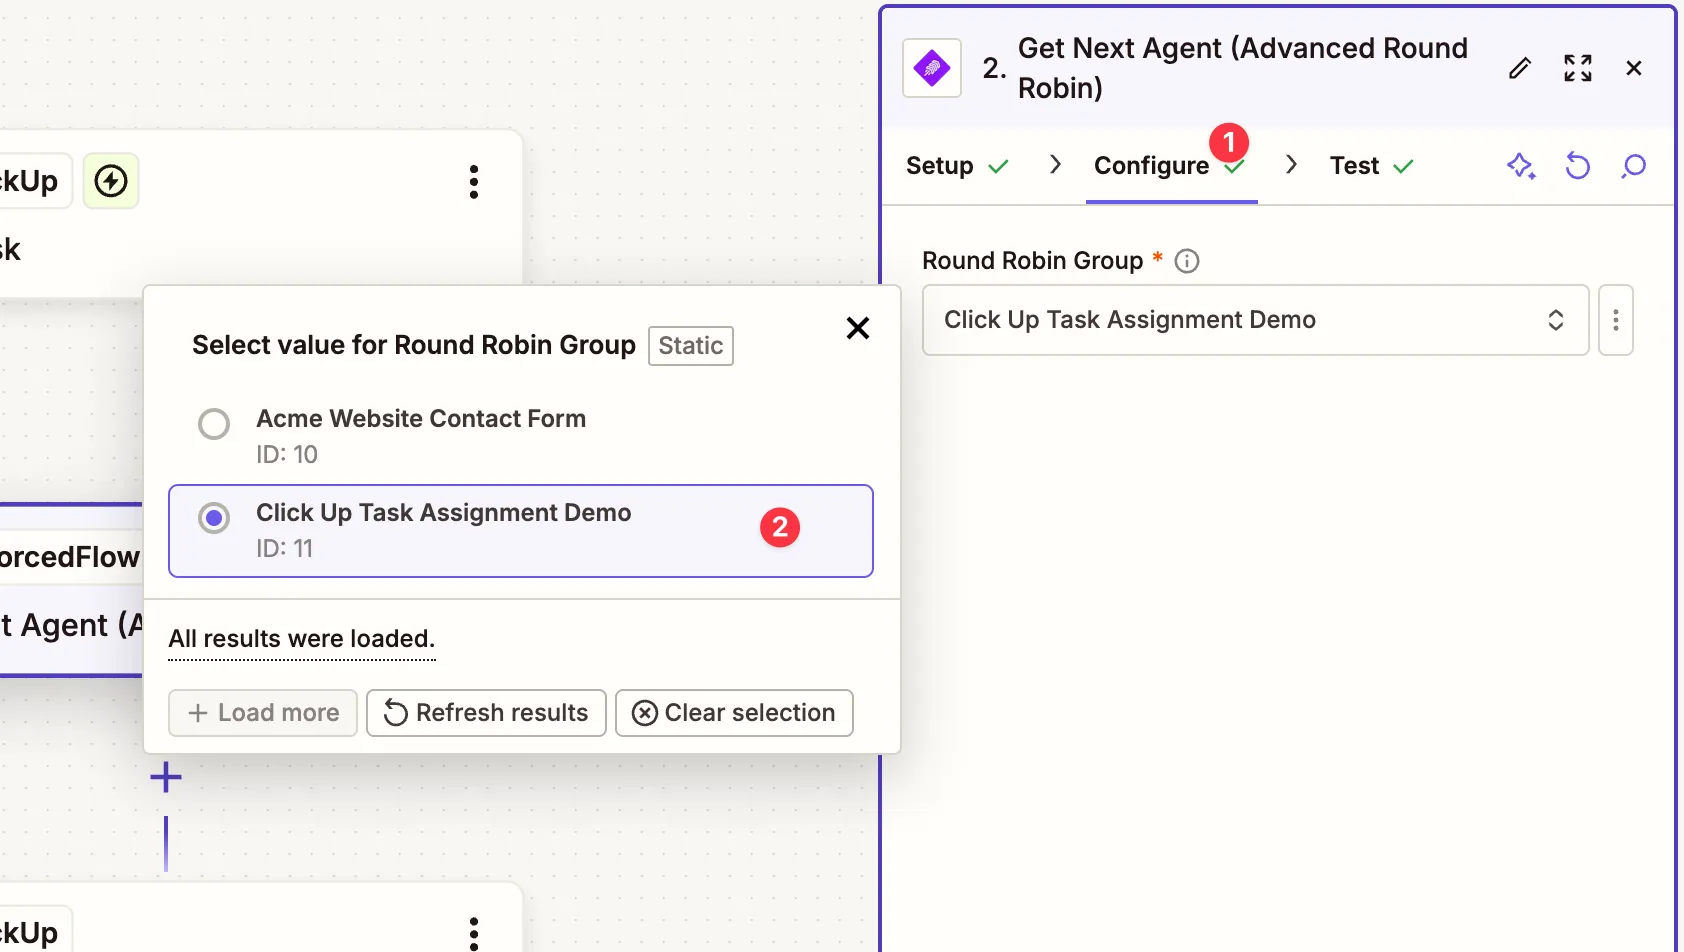
Select the Round Robin Group
Section titled “Select the Round Robin Group”- Click on Round Robin Group dropdown
- Select your group from the list
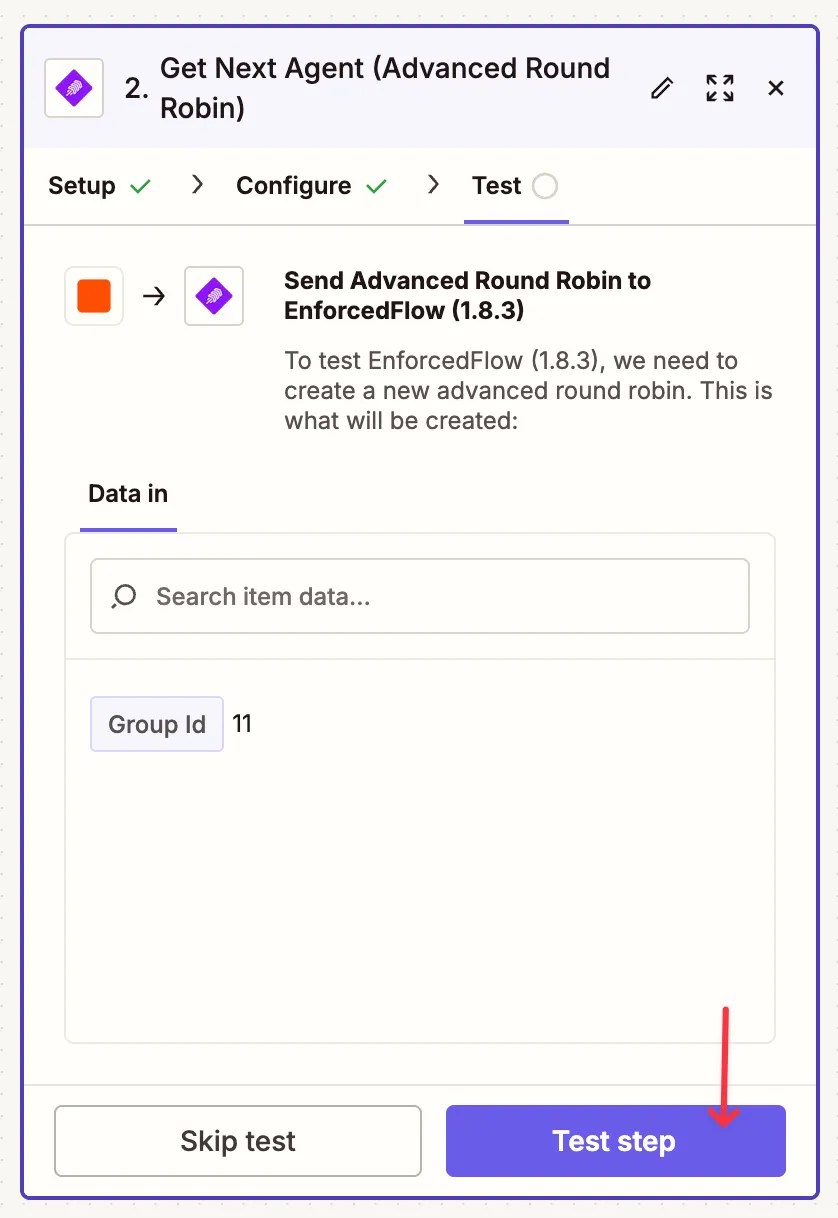
Test to Retrieve Agent Data
Section titled “Test to Retrieve Agent Data”Click Test step to retrieve agent data. This is required for the next step to work properly.
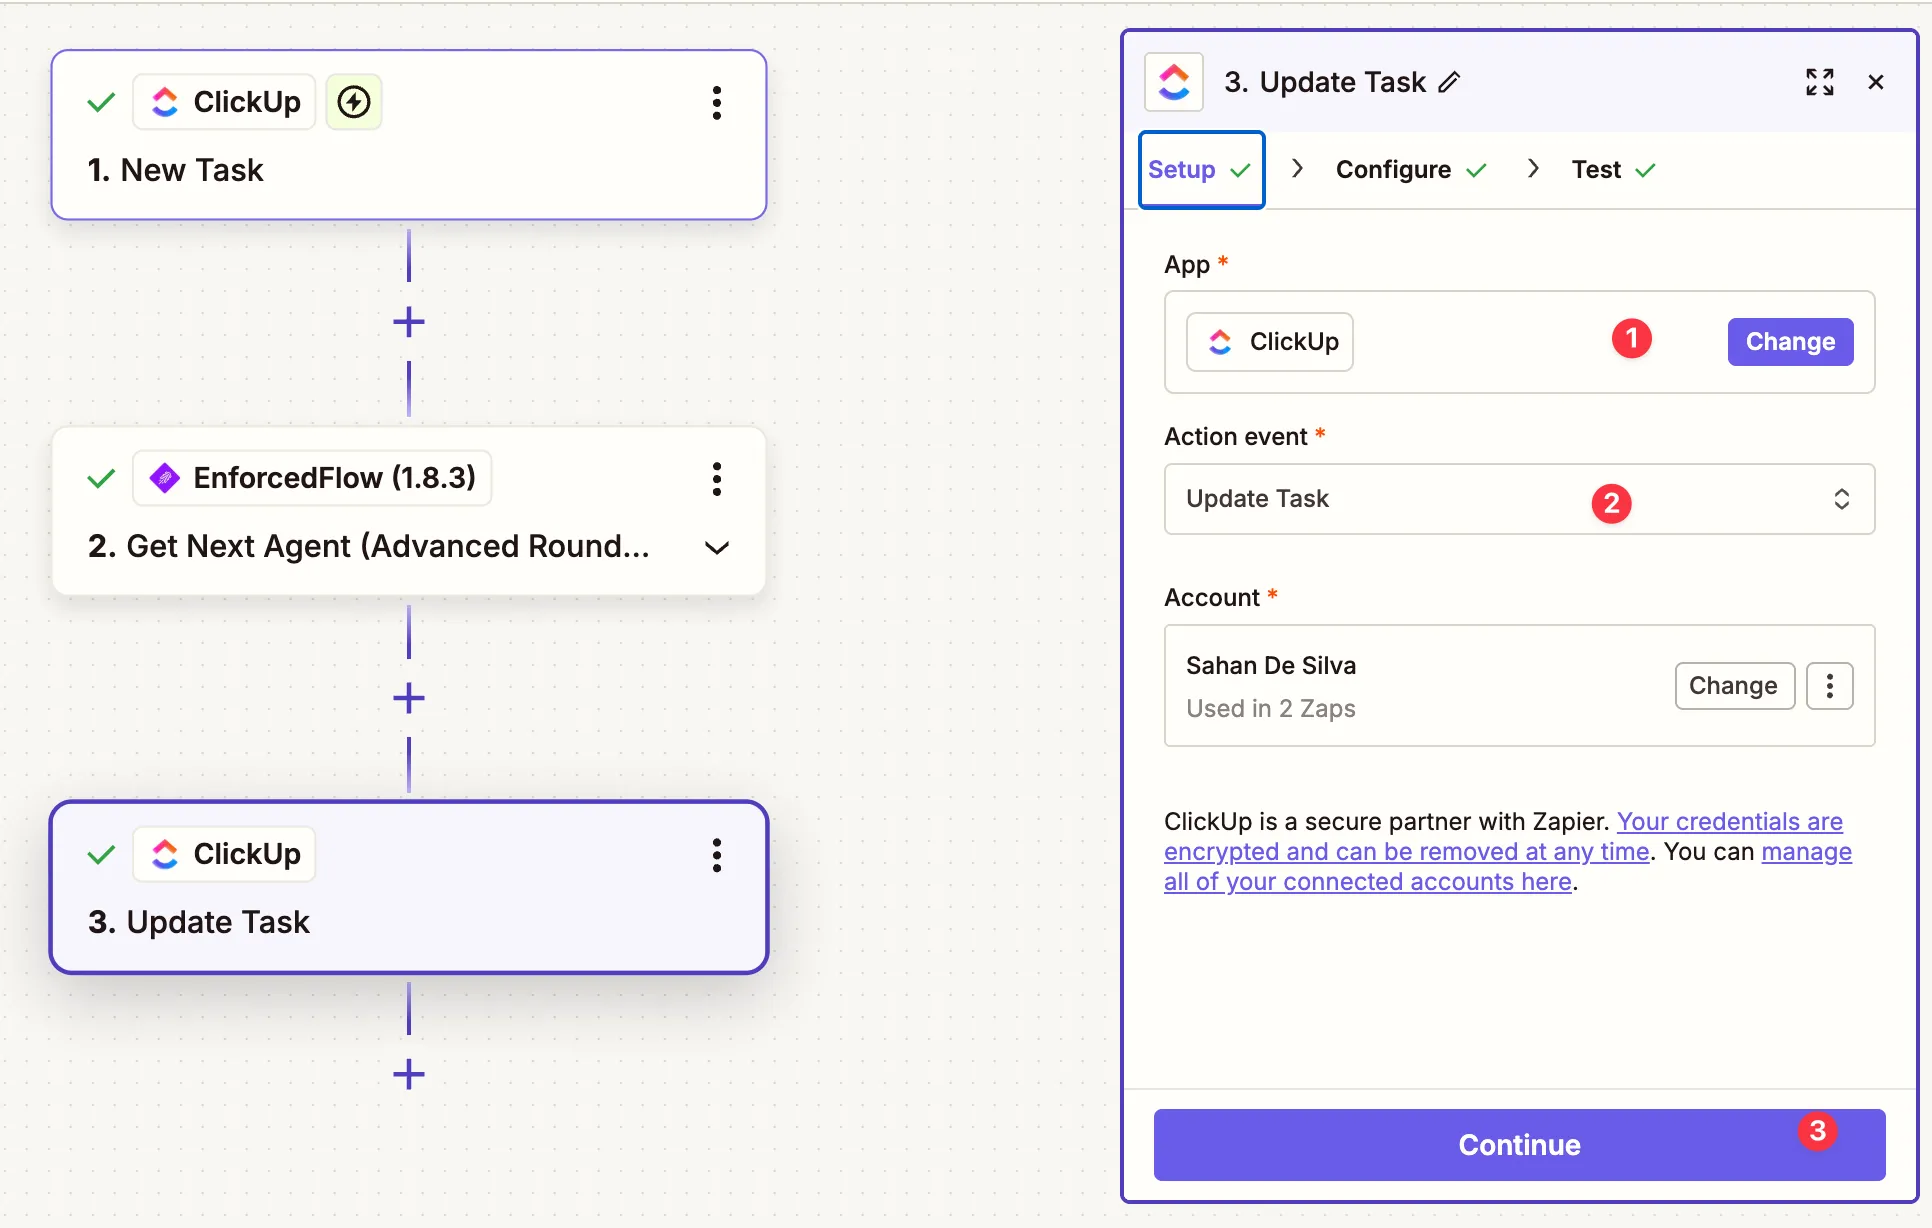
Step 3: Update the Task with the Assignee
Section titled “Step 3: Update the Task with the Assignee”Add another step and configure it:
- Select ClickUp as the app
- Choose Update Task as the action
- Connect your ClickUp account
- Click Continue
Note: Zapier may show a warning about potential loops. This is safe to ignore as long as your trigger is “New Task” and you’re using “Update Task” (not “Create Task”).
Configure the Update Task Action
Section titled “Configure the Update Task Action”- Select your Workspace
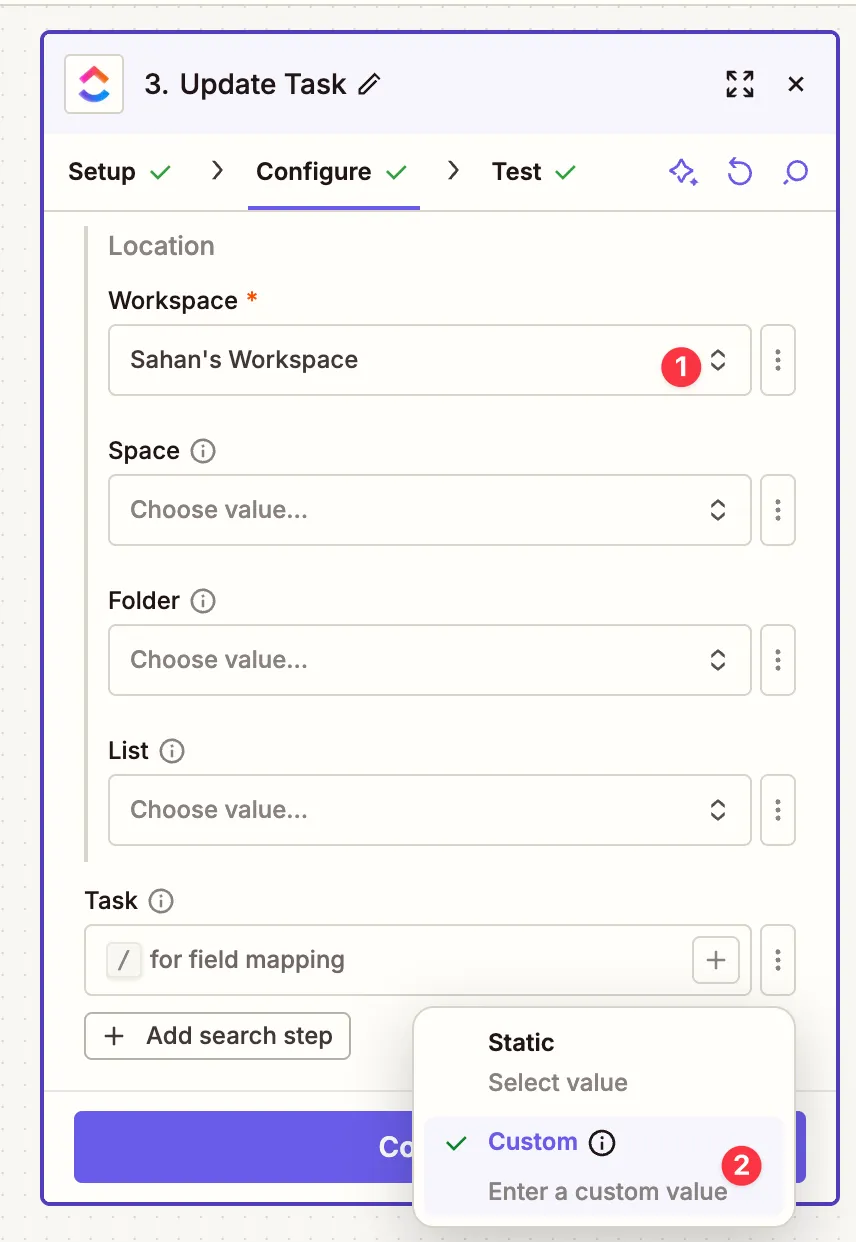
- For the Task field, click to switch to Custom mode
- Expand 1. New Task in ClickUp from Previous Steps
- Select Task Id to map the task from the trigger
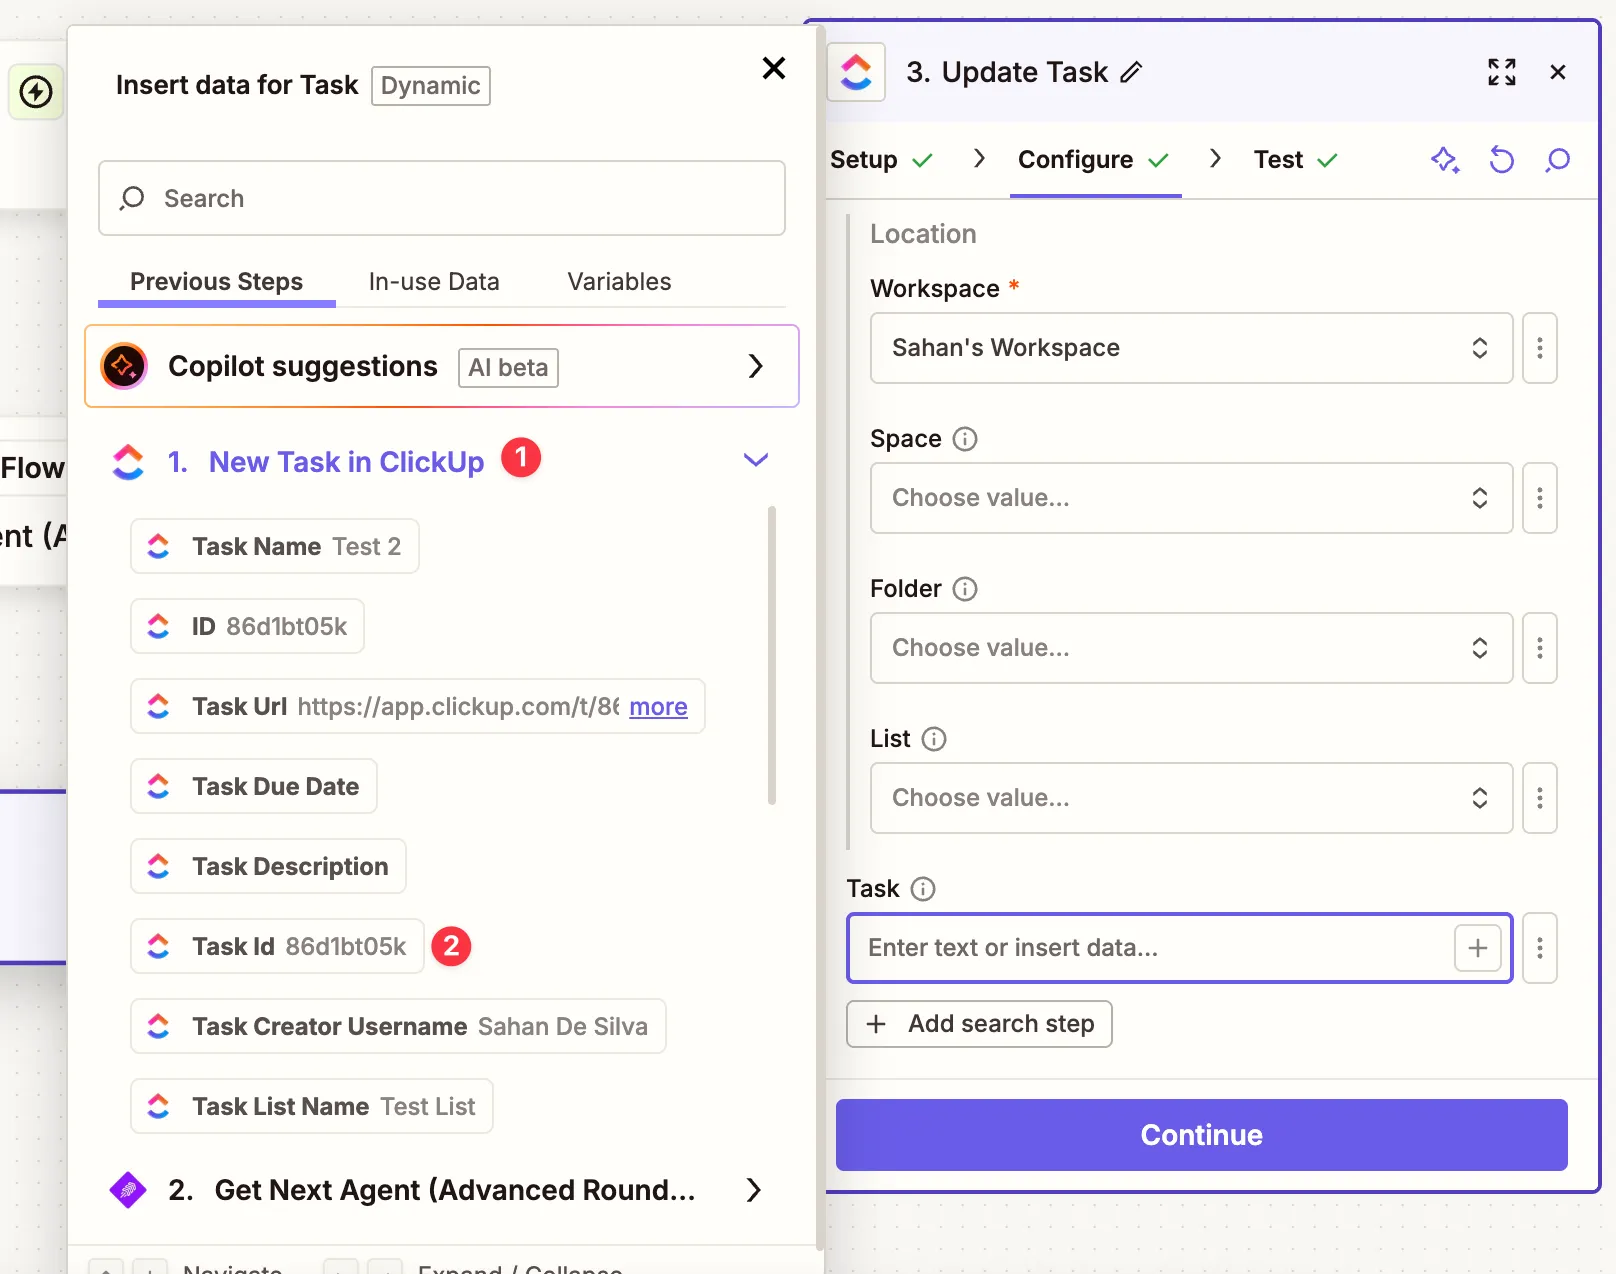
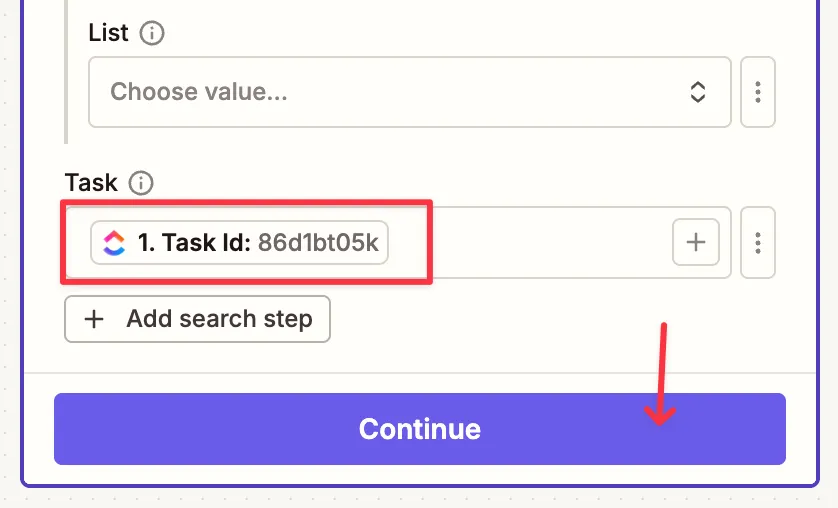
The Task field should now show the mapped Task Id.
- Scroll down to Add Assignee and select the Clickup User Id from the EnforcedFlow step
Publish the Automation
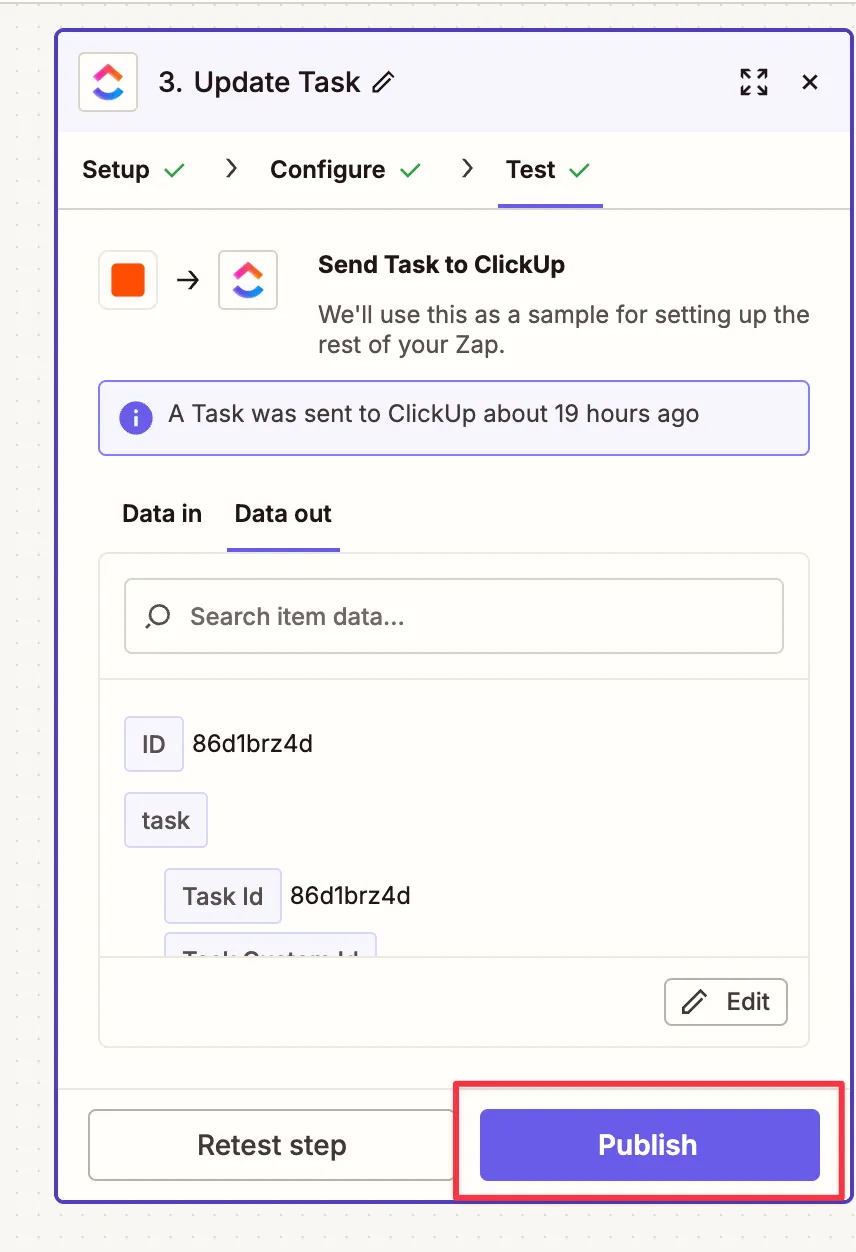
Section titled “Publish the Automation”- Test the step to verify it works
- Click Publish to activate the automation
Part 3: Automation 2 - Update Agent Workloads
Section titled “Part 3: Automation 2 - Update Agent Workloads”This automation runs periodically to count each agent’s tasks and update their weights, ensuring the round-robin stays balanced based on actual workload.
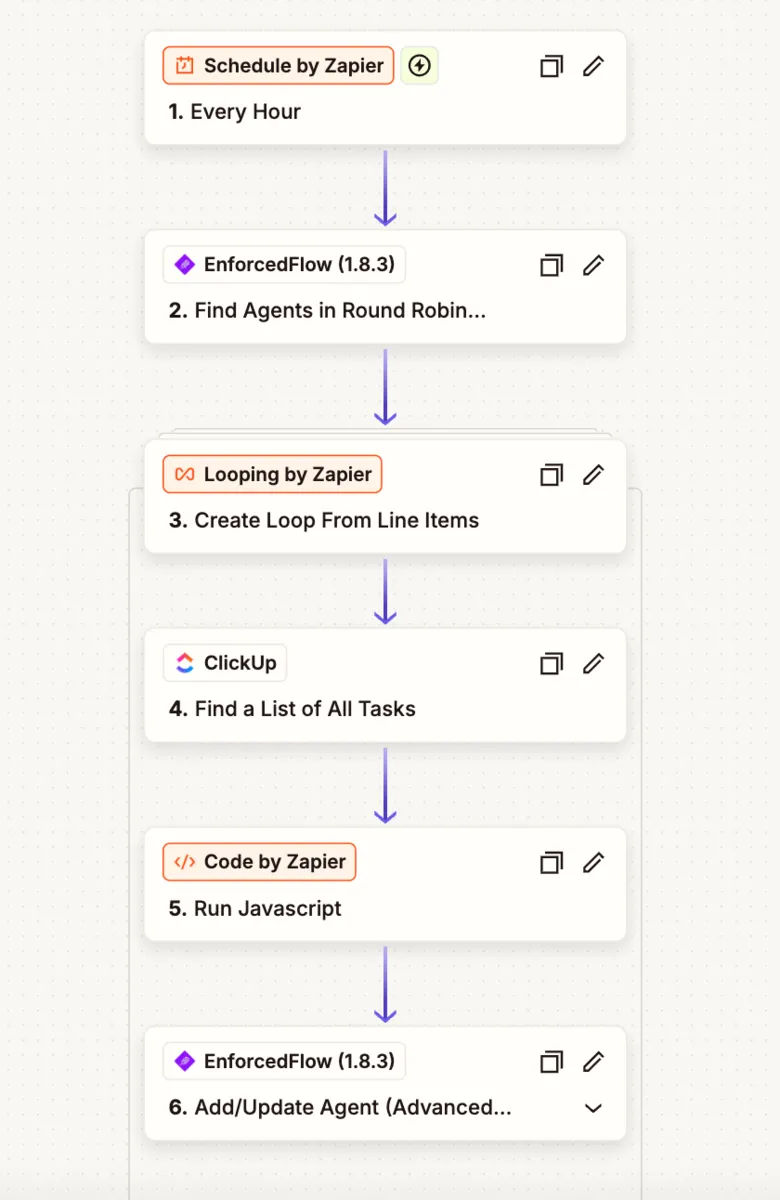
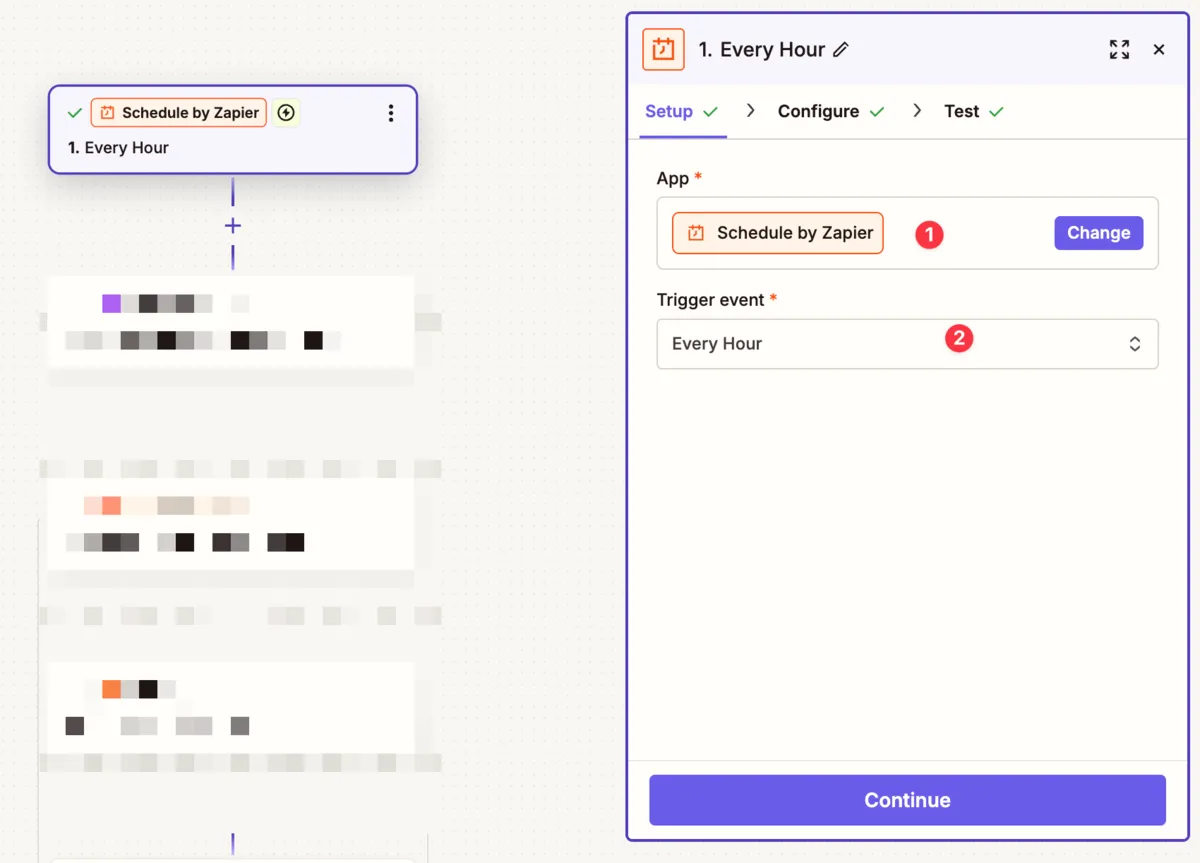
Step 1: Set Up the Schedule Trigger
Section titled “Step 1: Set Up the Schedule Trigger”- Create a new Zap
- Select Schedule by Zapier as the trigger app
- Choose Every Hour as the trigger event (adjust frequency as needed)
- Configure and continue
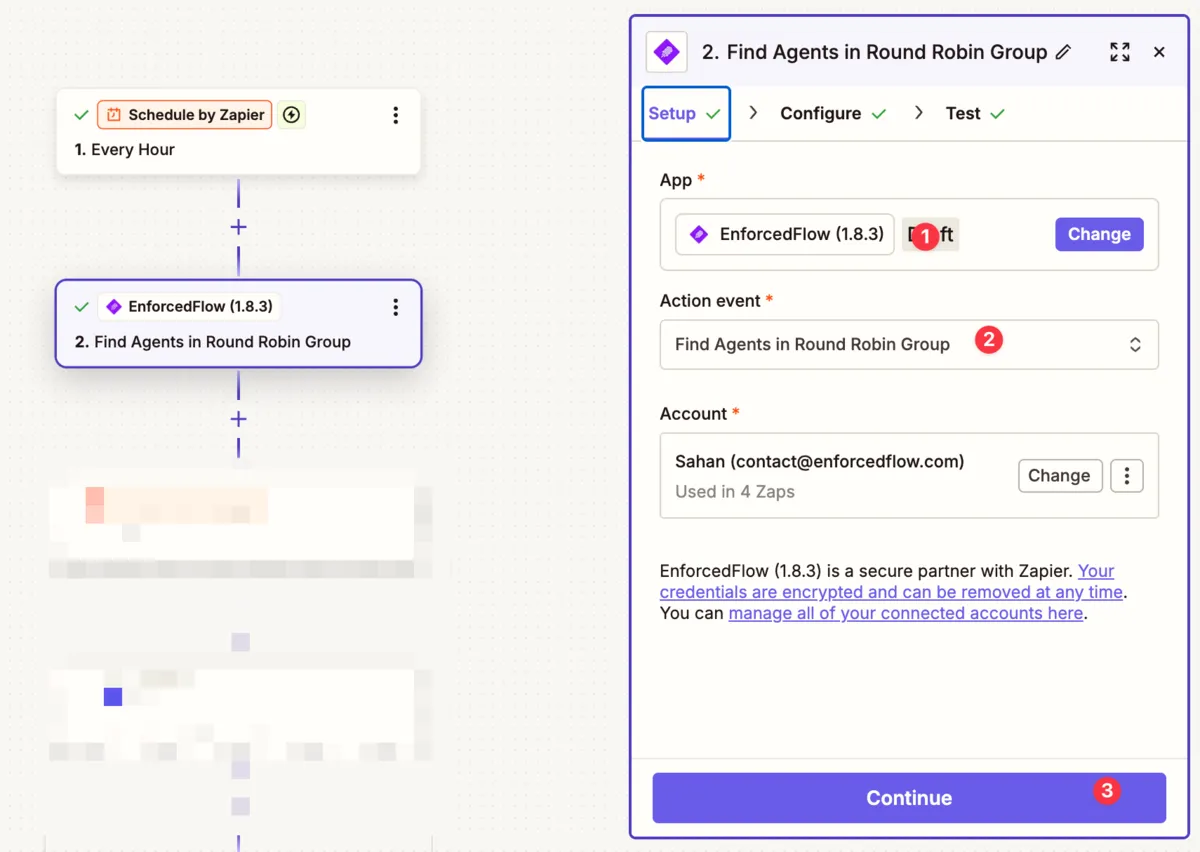
Step 2: Find Agents in the Round Robin Group
Section titled “Step 2: Find Agents in the Round Robin Group”- Add an EnforcedFlow action
- Select Find Agents in Round Robin Group
- Connect your account and select your group
- Test to retrieve the list of agents
This step returns all agents configured in your group (e.g., 3 agents with their ClickUp User IDs).
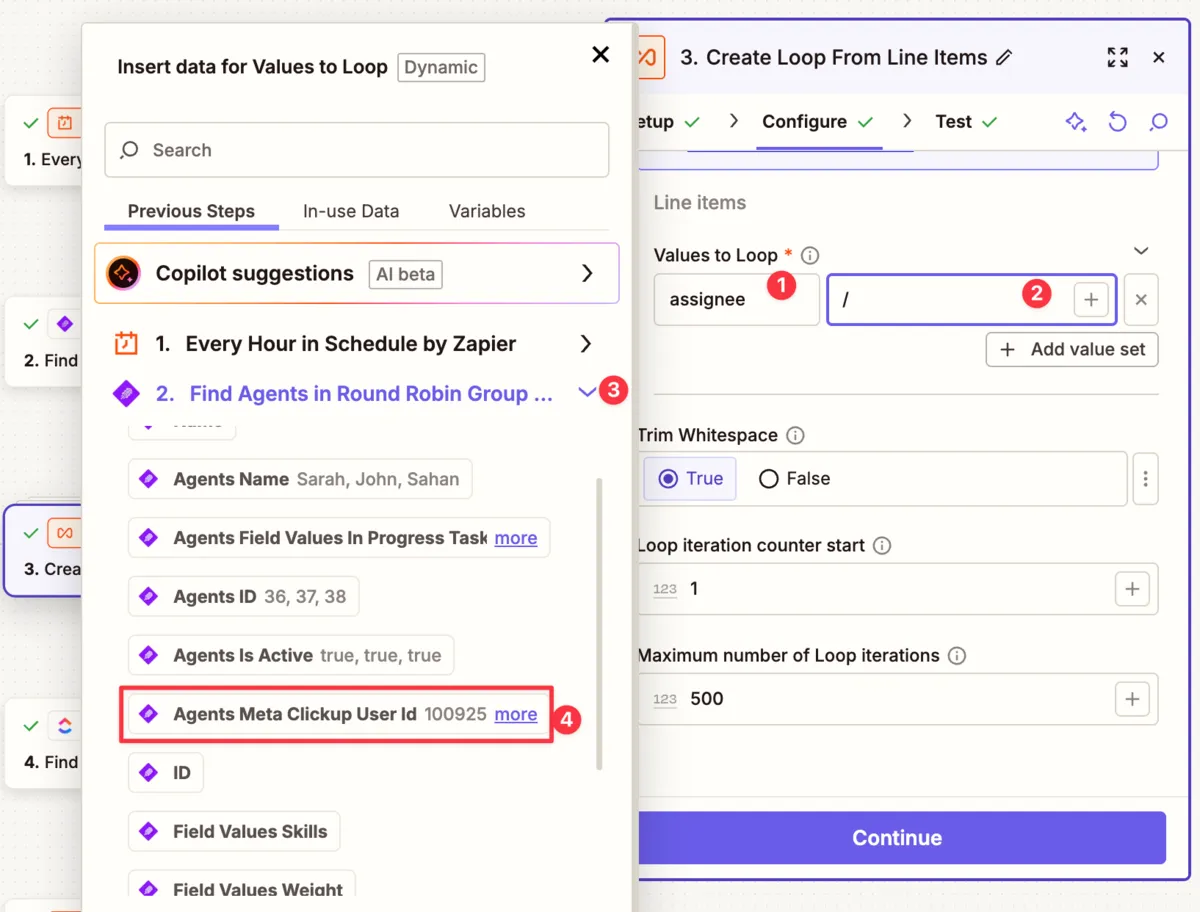
Step 3: Create a Loop to Process Each Agent
Section titled “Step 3: Create a Loop to Process Each Agent”Since we need to check each agent’s task count individually, we’ll use Zapier’s Loop feature.
- Add a Looping by Zapier action
- Select Create Loop From Line Items
- For the field, name it
Assignee - Click in the value field and use the / key to insert dynamic data
- Select Agents Meta Clickup User Id from the EnforcedFlow step
Test to confirm the loop iterates through each agent.
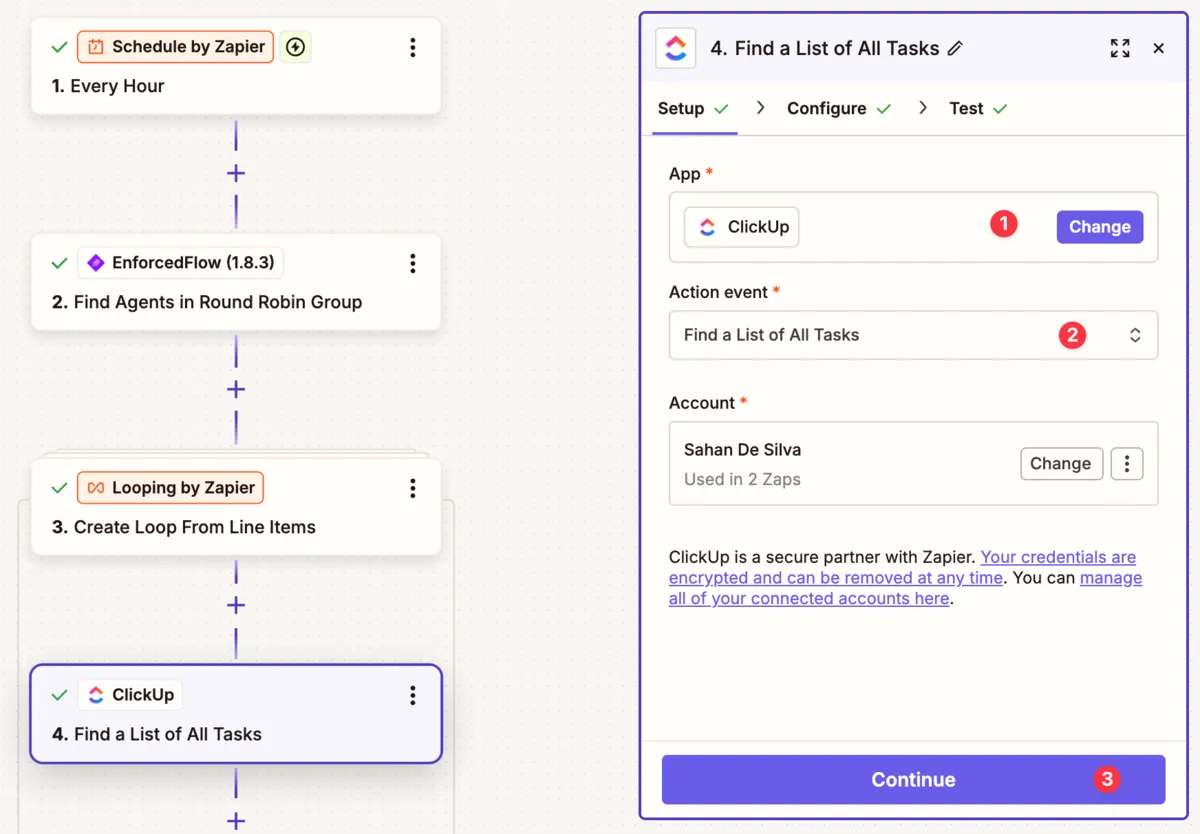
Step 4: Find Tasks Assigned to Each Agent
Section titled “Step 4: Find Tasks Assigned to Each Agent”Inside the loop, add a ClickUp action to find tasks for the current agent.
- Add a ClickUp action
- Select Find Tasks (List All)
- Select your Workspace
Configure Task Status Filters
Section titled “Configure Task Status Filters”Filter for active tasks only (tasks that represent actual workload):
-
Under Task Status, select statuses like:
- To Do
- In Progress
- Shortlisted
- (Exclude “Completed”)
-
Under Task Assignee, switch to Custom and select the Assignee from the Loop step
This ensures you only count incomplete tasks assigned to each specific agent.
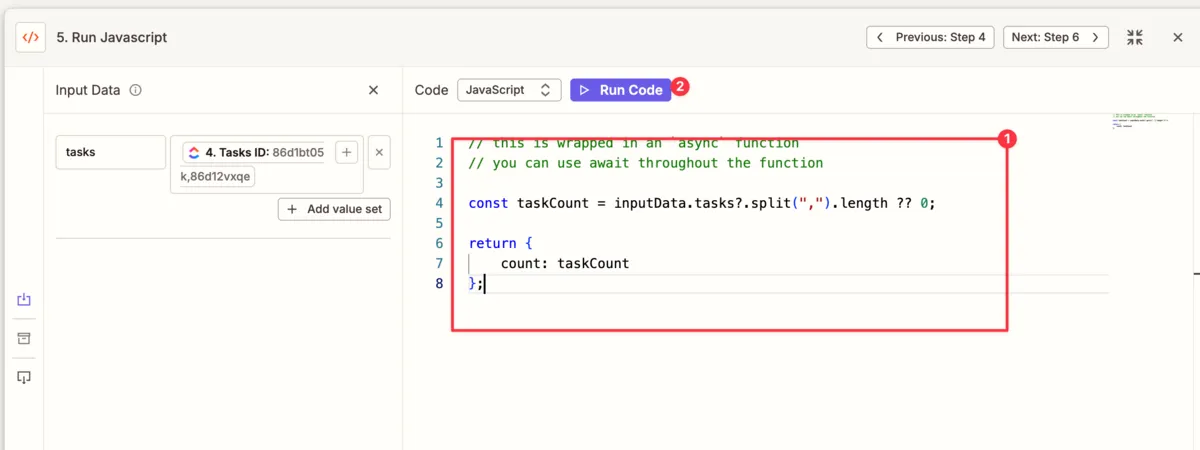
Step 5: Count the Tasks Using Code
Section titled “Step 5: Count the Tasks Using Code”The ClickUp step returns a list of tasks, but EnforcedFlow needs a number. Use Zapier’s Code step to count the tasks.
-
Add a Code by Zapier action
-
Select JavaScript as the language
-
In the Input Data section:
- Name:
tasks - Value: Select Task ID from the ClickUp step (Zapier will join multiple IDs with commas)
- Name:
JavaScript Code Snippet
Section titled “JavaScript Code Snippet”Use this code to count the tasks:
const taskList = inputData.tasks;const count = taskList ? taskList.split(',').length : 0;return { count };This code:
- Takes the comma-separated list of task IDs
- Splits it into an array
- Returns the count (or 0 if no tasks)
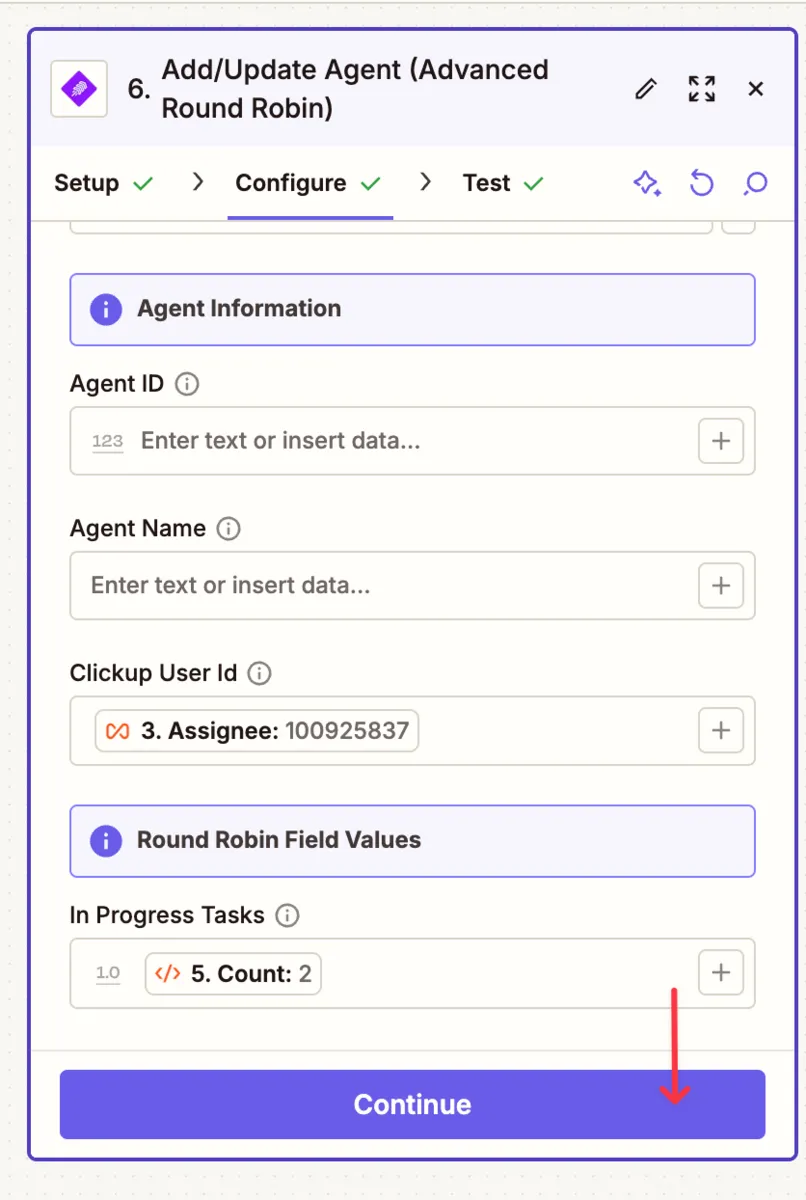
Step 6: Update the Agent’s Weight in EnforcedFlow
Section titled “Step 6: Update the Agent’s Weight in EnforcedFlow”Finally, update the agent’s weight with their task count.
- Add an EnforcedFlow action
- Select Add/Update Agent
- Select your group
- For ClickUp User ID, select the Assignee from the Loop step
- For InProgressTasks (the weight field), select the count from the Code step
Publish the Automation
Section titled “Publish the Automation”Test the full workflow and click Publish to activate it.
Testing Your Setup
Section titled “Testing Your Setup”Once both automations are published:
- Create a new task in your monitored ClickUp space
- Wait a few seconds for Zapier to process
- Verify the task was automatically assigned to an agent
- Check the EnforcedFlow dashboard to see current agent weights
The agent with the fewest in-progress tasks should receive the assignment. After the hourly update runs, weights will adjust based on actual workload.
Optional: Configure Working Hours
Section titled “Optional: Configure Working Hours”EnforcedFlow supports working hours configuration for each agent. When enabled, agents outside their working hours will be skipped during assignment.
To configure:
- Go to your group in EnforcedFlow
- Edit an agent
- Set their Working Days and Working Times
- Save the configuration
This is useful for teams across different time zones or with varying schedules.
Summary
Section titled “Summary”You’ve now set up a complete workload-balanced round-robin assignment system for ClickUp:
| Component | Purpose |
|---|---|
| EnforcedFlow Group | Stores agents, their ClickUp IDs, and workload weights |
| Automation 1 | Assigns new tasks to the agent with lowest workload |
| Automation 2 | Updates workload weights hourly based on actual task counts |
Key Benefits:
- Tasks are distributed fairly based on current workload
- No manual assignment needed
- Workload weights update automatically
- Optional working hours support
For questions or support, visit the EnforcedFlow documentation or contact support.